If you are using Salesforce.com with Enterprise, Unlimited and Developer edition, Record Type is a powerful feature. We can define business processes, picklist values, and page layouts to different users based on their profiles. So, even for the same object, user can have different page layout with different fields, different picklist value and etc.
But, sometimes admin overkill of Record Type usage. Not all condition need to use record type, may be a custom picklist field is enough. Please note that record type is different with a normal custom field and you cannot just edit record type like normal picklist field.
So, when do you need to setup record type?
1. Different Page Layout
Same user need to see different page layout based on a type. User will see different field position, required fields, buttons, related list for the same records.
2. Different Picklist Value
Configure available values in picklist field depends on the record type.
3. Assign record type only for certain profiles
We can set available record type and default record type for each profile.
This is some scenario you do not need to setup record type actually
1. Use as Type picklist
This is very bad, do you notice once you have record type, when user create new record, they have to select a record type before come to the main screen, so please plan ahead correctly.
2. Page layout usage
Not always need to have record type to differentiate user not see some fields in page layout. Admin can adjust using field level security, so some profiles will NEVER see that field, in page layout, report, etc.
Once you have more record type, it is more effort need to maintain, so if possible use less record type.
Here link to record type cheat sheet from Salesforce.com
Thursday, November 29, 2012

Sunday, November 18, 2012
Salesforce.com Queue SOQL
Queues allow groups of users to manage a shared workload more effectively. A queue is a location where records can be routed to await processing by a group member. The records remain in the queue until a user accepts them for processing or they are transferred to another queue. You can specify the set of objects that are supported by each queue, as well as the set of users that are allowed to retrieve records from the queue.
Queues available in almost all Salesforce.com edition, from: Contact Manager, Group, Professional, Enterprise, Unlimited, and Developer. Queues can be created for Leads, Cases, Knowledge article version, Service contract and custom object which not a child object in a master-detail relationship.
SOQL to query all queue:
Select g.Id, g.Name, g.Email from Group g where g.Type = 'Queue'
A queue can assign into one or many objects, here SQOL to retrieve object assigned in a queue:
Select q.Id, q.QueueId, q.Queue.Name, q.SobjectType from QueueSobject q
Note: you can you Apex Data Loader to mass insert or mass update the data in Group and QueueSobject object.
Click here for Salesforce.com help link for queues overview.
Queues available in almost all Salesforce.com edition, from: Contact Manager, Group, Professional, Enterprise, Unlimited, and Developer. Queues can be created for Leads, Cases, Knowledge article version, Service contract and custom object which not a child object in a master-detail relationship.
SOQL to query all queue:
Select g.Id, g.Name, g.Email from Group g where g.Type = 'Queue'
A queue can assign into one or many objects, here SQOL to retrieve object assigned in a queue:
Select q.Id, q.QueueId, q.Queue.Name, q.SobjectType from QueueSobject q
Note: you can you Apex Data Loader to mass insert or mass update the data in Group and QueueSobject object.
Click here for Salesforce.com help link for queues overview.
Wednesday, November 14, 2012
Salesforce: Custom Button to pre-populate Fields
Out-of-the-box, when we create a new record from a parent object related list, Salesforce.com provide parent name pre-populated in child object. This is efficient and save time, user do not need to look for the parent record again.


This is good, but, often we need more fields to be pre-populated for some scenario and make our (read: Salesforce users) life easier :)
We can make this happen by create new custom button whether in related list or in page layout. In this sample, we'll use Account as parent and Opportunity as child.
NOTE: This is considered a URL hack and it is not supported by Salesforce. Using undocumented query strings is absolutely discouraged as Salesforce can change them at any time without notice.
Custom button in page layout
Go to Account object in Setup menu and choose Buttons and Links. Click New button and select option as screenshot below. Once button created, you need to add the button into Account page layout.

Custom button in related list
Go to Opportunity object in Setup menu and choose Buttons and Links. Click New button and select option as screenshot below. Once button created, you also need to add the button in Opportunity related list in Account page layout.


OK, now we understand how to create the custom button, but what is the URL??? Here we go...
If you click Opportunity button in related list, see the URL
https://na1.salesforce.com/006/e?retURL=%2F0019000000DjwR5&accid=0019000000DjwR5&RecordType=01290000000NLfk&ent=Opportunity
So, what is the parameters and values? Let's parse it:
https://{instance}.salesforce.com/{object_prefix}/e?retURL=/{!Object.Id}&accid={!Object.Id}&RecordType={RecordTypeId}&ent={object_name}
In this sample there is record type in Opportunity and we want to skip Record Type selection page when user click new Opportunity by populating Record Type Id in the URL. So, this would be the URL:
/006/e?retURL=/{!Account.Id}&accid={!Account.Id}&RecordType=01290000000NLfk&ent=Opportunity
Now, we want to pre-populate other field from Account. Here we go... you need to find out the Id of textbox from web browser, in page edit the record and right click at textbox then select Inspect element

Once you get the id, add it into the URL:
/006/e?retURL=/{!Account.Id}&accid={!Account.Id}&RecordType=01290000000NLfk&00N90000000iQg4={!Account.Hello__c}&ent=Opportunity
Custom object
Parameter for pre-populate for lookup to an custom object id different, see sample below:
https://na1.salesforce.com/a0E/e?CF00N900000022p5z=Object+2A1&CF00N900000022p5z_lkid=a0D90000001OPvT&saveURL=%2Fa0D90000001OPvT&retURL=%2Fa0D90000001OPvT
Let's parse it:
https://na1.salesforce.com/{object_prefix}/e?CF00N900000022p5z={parent_object_name}&CF00N900000022p5z_lkid={parent_object_id}&saveURL=/{parent_object_id}&retURL=/{parent_object_id}
Notice that parent name is CF00N900000022p5z and parent id is CF00N900000022p5z_lkid and a new parameter saveURL to redirect the page after user hit Save button.
Considerations
Before you add more and more fields pre-populated, please consider this:
Auto-save
Some of you may looking for a way to autosave the record, Salesforce used to support parameter save=1, but for security reason to prevent Cross-Site Request Forgery (CSRF), this parameter has been removed.
You may look for AJAX toolkit to update + save record from a button.


This is good, but, often we need more fields to be pre-populated for some scenario and make our (read: Salesforce users) life easier :)
We can make this happen by create new custom button whether in related list or in page layout. In this sample, we'll use Account as parent and Opportunity as child.
NOTE: This is considered a URL hack and it is not supported by Salesforce. Using undocumented query strings is absolutely discouraged as Salesforce can change them at any time without notice.
Custom button in page layout
Go to Account object in Setup menu and choose Buttons and Links. Click New button and select option as screenshot below. Once button created, you need to add the button into Account page layout.

Custom button in related list
Go to Opportunity object in Setup menu and choose Buttons and Links. Click New button and select option as screenshot below. Once button created, you also need to add the button in Opportunity related list in Account page layout.


OK, now we understand how to create the custom button, but what is the URL??? Here we go...
If you click Opportunity button in related list, see the URL
https://na1.salesforce.com/006/e?retURL=%2F0019000000DjwR5&accid=0019000000DjwR5&RecordType=01290000000NLfk&ent=Opportunity
So, what is the parameters and values? Let's parse it:
https://{instance}.salesforce.com/{object_prefix}/e?retURL=/{!Object.Id}&accid={!Object.Id}&RecordType={RecordTypeId}&ent={object_name}
In this sample there is record type in Opportunity and we want to skip Record Type selection page when user click new Opportunity by populating Record Type Id in the URL. So, this would be the URL:
/006/e?retURL=/{!Account.Id}&accid={!Account.Id}&RecordType=01290000000NLfk&ent=Opportunity
Now, we want to pre-populate other field from Account. Here we go... you need to find out the Id of textbox from web browser, in page edit the record and right click at textbox then select Inspect element

Once you get the id, add it into the URL:
/006/e?retURL=/{!Account.Id}&accid={!Account.Id}&RecordType=01290000000NLfk&00N90000000iQg4={!Account.Hello__c}&ent=Opportunity
Custom object
Parameter for pre-populate for lookup to an custom object id different, see sample below:
https://na1.salesforce.com/a0E/e?CF00N900000022p5z=Object+2A1&CF00N900000022p5z_lkid=a0D90000001OPvT&saveURL=%2Fa0D90000001OPvT&retURL=%2Fa0D90000001OPvT
Let's parse it:
https://na1.salesforce.com/{object_prefix}/e?CF00N900000022p5z={parent_object_name}&CF00N900000022p5z_lkid={parent_object_id}&saveURL=/{parent_object_id}&retURL=/{parent_object_id}
Notice that parent name is CF00N900000022p5z and parent id is CF00N900000022p5z_lkid and a new parameter saveURL to redirect the page after user hit Save button.
Considerations
Before you add more and more fields pre-populated, please consider this:
- Sometime, if field in child object is not edit-able, consider to use formula field in child object
- If the field do not need to copy from parent, you can hardcode it into the URL
- To pre-populate data with some logic, you need visualforce page with apex code.
Video
Video created by 'Christian Deckert' is simply good to guide you step-by-step in creating URL for your custom button.
Auto-save
Some of you may looking for a way to autosave the record, Salesforce used to support parameter save=1, but for security reason to prevent Cross-Site Request Forgery (CSRF), this parameter has been removed.
You may look for AJAX toolkit to update + save record from a button.
Tuesday, November 13, 2012
Field Tracking
Out-of-the-box, Salesforce.com provide field tracking for up to 20 fields for standard and custom object. For custom object, you need to enable it by edit the object enable "Track Field History".

Once enabled, you will find a button "Set History Tracking" in "Custom Fields & Relationships" related list. For standard object, it will be there by default.
From "Set History Tracking" button, select fields you want to track up to 20 fields and yay... DONE!!
But, for Long Text Area field, it will just show who changed the field and when, that's all, no more information about what is the prior value and new value :( :(
Using Workflow and Field Update we can achieve this:
1. Create another Long Text Area to hold the history, in this sample, let's call it Response History to store history of Response (a long text area field).
2. Create a workflow with criteria ISNEW() || ISCHANGED( Response__c ).
3. Create an immediate workflow action with field update to update Response History field using this formula:
"Last Modified: " + LastModifiedBy.FirstName + ' ' + LastModifiedBy.LastName + ' ' +
TEXT(DAY(DATEVALUE(LastModifiedDate))) + '/' +
TEXT(MONTH(DATEVALUE(LastModifiedDate))) + '/' +
TEXT(YEAR(DATEVALUE(LastModifiedDate))) + ' ' +
CASE(LEFT(RIGHT(TEXT(LastModifiedDate),FIND(" ", TEXT(LastModifiedDate))-2),2),
'00','08',
'01','09',
'02','10',
'03','11',
'04','12',
'05','13',
'06','14',
'07','15',
'08','16',
'09','17',
'10','18',
'11','19',
'12','20',
'13','21',
'14','22',
'15','23',
'16','00',
'17','01',
'18','00',
'19','03',
'20','04',
'21','05',
'22','06',
'23','07','00')+
LEFT(RIGHT(TEXT(LastModifiedDate),FIND(" ", TEXT(LastModifiedDate))-4),6)
+ BR() + "------" + BR() +
PRIORVALUE( Response__c ) + BR() +
Response_History__c
Please note this formula only work with user without daylight saving timezone, because it will manually parse the time from GMT to your timezone (in sample above to GMT+8), because as of now Salesforce.com do not have TIMEVALUE() function yet. Otherwise, you can only capture the date OR display it in GMT timezone.
Here is the screenshot of the result:

Once enabled, you will find a button "Set History Tracking" in "Custom Fields & Relationships" related list. For standard object, it will be there by default.
From "Set History Tracking" button, select fields you want to track up to 20 fields and yay... DONE!!
But, for Long Text Area field, it will just show who changed the field and when, that's all, no more information about what is the prior value and new value :( :(
Using Workflow and Field Update we can achieve this:
1. Create another Long Text Area to hold the history, in this sample, let's call it Response History to store history of Response (a long text area field).
2. Create a workflow with criteria ISNEW() || ISCHANGED( Response__c ).
3. Create an immediate workflow action with field update to update Response History field using this formula:
"Last Modified: " + LastModifiedBy.FirstName + ' ' + LastModifiedBy.LastName + ' ' +
TEXT(DAY(DATEVALUE(LastModifiedDate))) + '/' +
TEXT(MONTH(DATEVALUE(LastModifiedDate))) + '/' +
TEXT(YEAR(DATEVALUE(LastModifiedDate))) + ' ' +
CASE(LEFT(RIGHT(TEXT(LastModifiedDate),FIND(" ", TEXT(LastModifiedDate))-2),2),
'00','08',
'01','09',
'02','10',
'03','11',
'04','12',
'05','13',
'06','14',
'07','15',
'08','16',
'09','17',
'10','18',
'11','19',
'12','20',
'13','21',
'14','22',
'15','23',
'16','00',
'17','01',
'18','00',
'19','03',
'20','04',
'21','05',
'22','06',
'23','07','00')+
LEFT(RIGHT(TEXT(LastModifiedDate),FIND(" ", TEXT(LastModifiedDate))-4),6)
+ BR() + "------" + BR() +
PRIORVALUE( Response__c ) + BR() +
Response_History__c
Please note this formula only work with user without daylight saving timezone, because it will manually parse the time from GMT to your timezone (in sample above to GMT+8), because as of now Salesforce.com do not have TIMEVALUE() function yet. Otherwise, you can only capture the date OR display it in GMT timezone.
Here is the screenshot of the result:

Monday, November 12, 2012
Salesforce: Master-Detail relationship

Some new Salesforce admins may confuse with the different between Master-Detail relationship with Lookup relationship, since both are used to link an object to another object, and you can use parent-child relationships in SOQL queries for both relationship.
But fundamentally, it is different between Master-Detail with Lookup relationship, few items you need to notice on Master-Detail relationship:
- When a record of the master object is deleted, its related detail records are also deleted.
- The owner field on the detail object is not available and is automatically set to the owner of its associated master record.
- The detail record inherits the sharing and security settings of its master record.
- The master object field is always required in the page layout of the detail record (in child object).
- By default, records can’t be re-parented in master-detail relationships. However, administrator can set to allow child records in master-detail relationships on custom objects to be re-parented to different parent records, by enabling Allow re-parenting check box in the master-detail relationship definition.
- You can define master-detail relationships between custom objects.
- You also can define master-detail relationships between a custom object and a standard object, but the standard object cannot be on the detail side of a relationship with a custom object. In addition, you cannot create a master-detail relationship in which the User or Lead objects are the master.
- You can display detail object record as custom related list on master object page layouts.
You cannot create tab for a child object- You can use master-detail relationships to model many-to-many relationships between any two objects. Maximum 2 master-detail relationship from a custom object.
- If the object is master of 1 or more detail object, you only can have 1 parent object for that object.
- If you have Roll-Up Summary field in parent and summarized with particular child object, when you create / update that child record, it will "edit" parent record, so if any validation rule triggered, it will stop to save when create / update child record.
Salesforce: Assign using active assignment rule
In Case and Lead, the Salesforce admin can configure Assignment Rules to automatically assign a newly created Lead or Case to a specific User or Queue. This assignment rule will trigger upon the case or lead creation, regardless of how the case or lead is created.
The rule will also run when editing the case or lead by clicking the Edit button, however, it will not run by clicking the pencil icon on a field (vote this idea) or edit from API (such as Workbench), so this rule is ideal only for manual record creation from Salesforce web user interface.
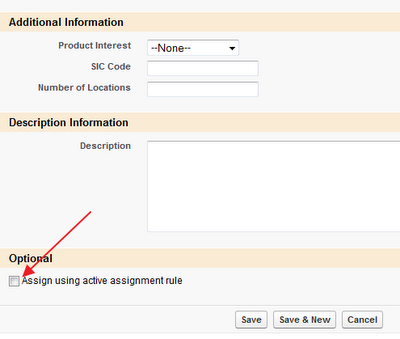
If necessary, you can set the "Assign using active assignment rule" checkbox visible, this will allow your users to manually enable or disable the assignment rule, the "Assign using active assignment rule" checkbox will be visible on creating or editing the record (from Edit button).
Case


If necessary, you can set the "Assign using active assignment rule" checkbox visible, this will allow your users to manually enable or disable the assignment rule, the "Assign using active assignment rule" checkbox will be visible on creating or editing the record (from Edit button).
Lead


How to configured?
Go to Setup | Object Manager | Leads or Cases | Page Layouts, then click the Layout Properties button, then enable Default.
Case page layout

Lead layout properties

Case layout properties
Once you have the assignment rule configured, the best practice is to hide that checkbox "Assign using active assignment rule", so the rule will always run. Although in some scenarios, even if you want to let the checkbox visible, set the Default enabled by default. This checkbox is located at the far bottom of the record page, so some users may not even notice it.
How to hide the checkbox "Assign using active assignment rule"?
Untick "Show on edit page" in the page layout properties. Even the checkbox is not shown, the assignment rule will work as configured, as long as the Default in the Lead or Case Assignment Checkbox is enabled in the layout properties
Reference:
Subscribe to:
Posts (Atom)