Pages

Showing posts with label Action. Show all posts

Monday, May 20, 2024

Salesforce: Target Object for Create a Record Action Type

We discussed in an earlier blog that we can use an action to "find" a child object; however, for a child object with multiple parent objects, the object may not be available for selection as a Target Object in “Create a Record” quick actions.

Salesforce does not allow to create the actions to related child entity when we have multiple relations of different types to the child entity. 

For Example:

Custom objects A-B with Master-Detail relationship and custom objects A-C with Master-Detail relationship too --> create quick action “Create a Record” on A, you will see both B and C as target objects.


Custom objects D-E with a Master-Detail relationship and custom objects F-E with a Lookup relationship, too --> create a quick action “Create a Record” on D; you will see E as the target object, but create a quick action “Create a Record” on F; you will NOT see E as the target object.


* blue line = Master-Detail and red line = Lookup relationship


Now, change the D-E objects relationship to Lookup, and you will see E as the target object from both D and F.


If you change both the D-E and F-E relationships to Master Detail, you will see E as the target object from both D and F too.


Reference

Wednesday, March 21, 2018

Salesforce: Call Flow from Action

If you check this blog again Global Actions in Lightning, Action Tyle = Flow only available in Object-Specific action, and not in Global Action. In this blog, we will share how to call Flow from an action, but will not share the basic on how to create action or how to create flow.

Use case: to increase efficiency, business users of Universal Container request the ability to update Number of Employee of Account directly from Opportunity screen.

Solution: create a flow and call it from Action.


1. Create Flow
Make sure the flow must be active and have screens, so it can't be Autolaunched Flow. Flow actions let you pass the value of the record's ID field into the flow, but that's it. Your flow needs to have a variable with Text Input called recordId, the action passes the record's ID into that variable at runtime.

see all items in Explorer panel

1st box - to get Account Id. Remember this Flow will be located in Opportunity so the variable "recordId" will return would be Opportunity Id, not Account Id. In short, this box is to query Account Id from Opportunity object.

2nd box - to get Account Name and Number of Employee. Use Account Id return from 1st query to retrieve Account Name and Number of Employee from Account object.

3rd box - in this box, the user will enter Number of Employees to update into Account, but to make it nicer, we can display Opportunity Id, Account Id, Account Name, and pre-populate Number of Employee in the textbox for user to update.

4th box - this box will save Number of Employee from screen to Account object.


2. Create Action
Create new Action with Action Type = Flow.
Select the Flow created in step 1.
Add the action to "Salesforce Mobile and Lightning Experience Actions" panel in Opportunity Page Layout, in Lightning this action will become a button, while in Salesforce mobile app it will become an icon in action bars.


3. Showtime
Now open an opportunity, you should notice a button called "Update Acct Employee".
Click the button, it will show Account Id, Opportunity Id, Account Name and pre-populate existing Number of Employee from Account.

Lightning Experience

Salesforce mobile app


I am not sure if this is a good use case because you can get something almost similar using action type "Update a Record", check this blog Update Parent Record with Action, but if your screen have logics that need query, or with multiple screens, a single "Update a Record" action will not able to  handle it, calling a Flow from an action would be a better options.


Reference:
- Update Parent Record with Action
- Global Actions in Lightning
- Flow Action Considerations
- Launch a Flow from an Object-Specific Action


Tuesday, March 20, 2018

Salesforce: Mobile Smart Actions

Mobile smart actions are quick actions that are available for Account, Case, Contact, Lead, Opportunity, custom object page, and also in the global publisher layout. The purpose of this action is only for Salesforce mobile app. Mobile smart actions don’t appear in the full Salesforce site, regardless of which page layouts you add them to, they appear only to users in the Salesforce mobile app.

Mobile smart actions appear as a single action element in the page layout editor. However, they appear as many actions in the action bar in the Salesforce app. The bundle of actions element is varied on each supported object, example: you will see New Opportunity in Account, but not in Contact. You can refer all actions available in Mobile Smart Actions from this document.

You can’t change which actions are included as part of a mobile smart actions bundle, example: you would like to remove New Event action from Case, the solution for this is to remove Mobile Smart Actions, then add the individual actions in the object page layout or Global Publisher layout.

If you have the individual action such as New Task in Salesforce Mobile and Lightning Experience Actions page layout for Account, then you also have Mobile Smart Actions for the same Account layout, New Task will appear twice in the Salesforce mobile app, but only one New Task in Lightning Experience.

New Task appears twice in mobile app


New Task appears only once in Lightning


ReferenceMobile Smart Actions


Tuesday, March 13, 2018

Salesforce: Update Parent Record with Action

Use case: the request is to have the ability to update some fields in parent record object (such as Account) from a child record (such as Contact) page.

Before Lightning (read in Classic), you need to write a visualforce page with apex controller, then add the visualforce page into Contact page layout.

In Ligthning Experience, this becomes much simpler with Lightning Page + Lightning Component + Action, it sounds a lot, but actually, it's very simple, just a few clicks without any script involved. Let's get this started:

1. Create Action in Account
Because we are Account from Contact, the Action must be created in Account.
- Navigate to Setup | Object Manager | Account | Buttons, Links, and Actions
- Click New Action button
- Enter as the screenshot below:


2. Set Action Layout
From the action created, click Edit Layout button, remove default fields added, add fields that you would like the user to update, and click Save button. You can set the fields as Read-Only or Required, even they are not in the object itself page layout.


3. Edit Contact Lightning Page
Navigate to  Setup | Object Manager | Contact | Lightning Record Pages
Click the page, then click Edit button.


4. Add Component
From Standard components available in the Component panel at the left, drag Related Records component into Lightning Page.


5. Select the Action
Select component added and change the values, change Lookup Field value from "Use This Contact" to "Account Name", then change Update Action with action just created. See screenshot below


6. Showtime
Now, open a contact and check the component added. If you have the permission to update Account, you will be able to update Account fields from here.


Monday, March 12, 2018

Salesforce: Action in Lightning to replace URL Hacks in Classic

In Classic, many of us implemented URL hack, the purpose is to populate a value, example: populate a value from Account field into Opportunity when creating new Opportunity, but also allows the user to change it manually.

But, when switch to Lightning, URL hack will not work. In Lightning, you can implement Action to replace URL hack. Here is the step.

Use Case: to pre-populate Payment Term and Area (both are custom fields) in Opportunity when create Opportunity from Account, both fields are available in Account and Opportunity, although the field type may different.
Account:
- Area = Lookup
- Payment Term = Picklist

Opportunity:
- Area = Lookup
- Payment Term = Number

1. Create New Action in Account
Because we are creating Opportunity from Account, the Action must be create from Account.
- Navigate to Setup | Object Manager | Account | Buttons, Links, and Actions
- Click New Action button
- Enter as screenshot below (in my Opportunity, I have record type, therefore need to populate).


2. Edit Action Layout
From action created, click Edit Layout, remove default fields added, add both Area and Payment Term, and click Save button.


3. Add Predefined Field Values
Still in Action created, look for Predefined Field Values section and click New button. Select the Opportunity field name, since we have 2 fields to pre-populate, repeat this step twice.
You need to enter formula text, see screenshot below.


4. Add the Action to Account page layout
Still, in Account object manager, click Page Layouts menu, then click the Page Layout name.
Click Mobile & Lightning Actions section, then drag New Opportunity to Salesforce Mobile and Lightning Experience Actions.


5. New Opportunity
Now you should see New Opportunity button when open Account record page.


Click the button and system will popup New Opportunity action window with fields added in action layout. Both fields value should have been populated, and the user also allows to change it too.


One of the drawback when the user creates new opportunities not from the action button, e.g., from New button in Opportunity Related List, the values will be not pre-populated.


Reference: Trailhead: Create Object-Specific Quick Actions


Tuesday, March 6, 2018

Salesforce: Global Actions in Salesforce Classic

This blog is a continuation from previous blog Salesforce Global Actions in Lightning and Salesforce mobile app, let's take a step back where and how the same Global Actions appeared in Classic.

The use case here, customer is still in Classic, but working to migrate to Lightning by introducing Lightning for pilot or partial users, so the rest of other users still in Classic.

In Classic, Global Actions will appear in Chatter tab.


The actions available and order is following "Quick Actions in the Salesforce Classic Publisher"


If you notice the lower panel at above screenshot "Salesforce Mobile and Lightning Experience Actions", this mean, you can have different global actions available between Classic with Lightning and Mobile.

First, click tool icon at lower right of "Salesforce Mobile and Lightning Experience Actions" to overwrite actions available for "Salesforce Mobile and Lightning Experience Actions".


Now, you should get list of actions in "Mobile and Lightning Experience Actions" exactly the same with "Quick Actions in the Salesforce Classic". From here, you can modify available actions removing exiting actions by drag the action out of panel, or add new action available from "Mobile & Lightning Actions" panel. Let's say we have following actions for Mobile and Lightning Experience.


For users in Lightning, the below screenshot result from changed done in above Global Publisher layout. All Chatter Standard actions will be not available, and the default New Opportunity is not appeared, because this org. have record type implemented in Opportunity.


Reference:


Monday, March 5, 2018

Salesforce: Global Actions in Salesforce mobile app

This blog is a continuation from previous blog Salesforce Global Actions in Lightning, the same Global Actions added to the page layout will appear Salesforce mobile app in Chatter and Today page.

Side note: since Oct 2017, Salesforce1 mobile app has been renamed to Salesforce.

We will use the same page layout with global actions added in the previous blog for Lightning. From below screenshot, the actions in yellow are shown in Lightning, while the actions in green are Standard Chatter actions.


Let us see how they appear in Salesforce mobile app.


Now, we see all actions in Salesforce mobile app, including Standard Chatter actions: Post, File, Link, Poll, Question, and Thanks.

All other actions are shown in Lightning also available in Salesforce mobile app. The same for New Account action, because this org. have record type for Account, this default action will not show in the mobile app too, we cannot select record type when creating a record using Action.


Reference:


Salesforce: Global Actions in Lightning

Global Actions not only can be used in Salesforce mobile app and Salesforce for Outlook but also in Lightning experience. Global actions are intended for users want to do something quickly, one of the actions is to create object record quickly, but the new record will not auto relate with other records, such as when creating Contact for Account, the user need to manually select the Account from New Contact action layout.

Global Actions in Lightning experience appear at the top right in the "+" icon.


How/where above actions are defined?
In the setup menu, search for Global Actions, and select Publisher Layouts, you will see one or many layouts here (many if other admins have create it), if you have many layouts, you can assign the different layouts to different profiles. Within the layout, you can define the actions available and the order of actions.

Below screenshot is the layout setup for above screenshot of global actions in Lightning. If you realize, only the one in yellow highlight appears in Lightning experience.


By default, "Salesforce Mobile and Lightning Experience Actions" will follow "Quick Actions in the Salesforce Classic Publisher", if that is not overwritten.


Why fewer actions are shown in Lightning compare with actions added in the page layout?
Post, File, Link, Poll, Questions, and Thanks are Chatter actions, they will be not shown in Lightning.
New Account in this scenario is not shown in Lightning Global Actions, this New Account is default Global Actions provided by default, but since this org. have record type for Account, therefore it will not show, we cannot select record type when creating a record using Action.

New Account 1 and New Account 2 are custom actions added in Global Actions, but with the populated record type, so they appear in the Lightning Global Actions.


Side note: if you notice there is a checkbox "Chatter Feed Item", if this is enabled, when the user creates the record from Action, there will be Chatter Post for the record. 


Now, let's login as other users with lesser permissions.


Compare with the 1st screenshot, this user only allows to create new Note and Account with Record Type = Normal (see 3rd screenshot). Available actions will be auto adjusted as per user permissions defined in Profile and Permission Set. This user does not have permission to create Task, Event, Contact, and Account with record types = Not-Normal.


Action Type in Global Actionwhat action can do in Global Action?


Action Type in Object-Specific Action let's compare what action available in object-specific actions


In Global Action, we have additional action types which are not in object specific action:
- Send Email
- Custom Canvas

While in object specific action, we also have additional action types which are not in global action:
- Update Record
- Flow


Reference:


Friday, February 20, 2015

Add or remove Actions in Salesforce mobile app

Since version 7, Salesforce1 mobile app has replaced + icon to open Publisher Actions page with Action Bars and Action Menu. Before version 7, when user tap + icon, it will open the new page with multiple icons and paging.


In version 7, this is completely changed with Actions Bar.


Depending on which menu or record page user is viewing, the user will see different actions available in the action bar.

From Feed (or Chatter in the newer app version) and Today page, the user will see a set of actions (this may include Standard Chatter actions and Mobile Smart actions) defined in Global Publisher Layout, you can have multiple layouts and assigned to different profiles.

However, from a record page, the user will see a mix of actions and buttons added to object page layout:
  • Standard Chatter actions: such as Post, File, Link, Poll, Question, and Thanks.
  • Default actions: depend on the objects.
  • Mobile Smart actions: a set of preconfigured actions, just like default actions. They are available for account, case, contact, lead, opportunity, and custom object layout, including in Global Publisher layout.
  • Custom actions: actions that you create and customize, such as Create a Record, Update Record actions.
  • Productivity actions: depends on the objects. The actions include Call, Send Text, View Website, and Email.
  • Standard button: such as Change Owner, Change Record Type, Edit, Delete (action will be shown only if the user has the permission or the object fit the criteria, such as object with Record Type).
  • Custom button: buttons created with Display Type = Detail Page Button
If you have more than 5 icons, tap ... icon to open Action Menu which contains the full set of actions available for that page or record.


Global Actions
Appear in Feed (or Chatter in the newer app version) and Today page, by default Actions Bar will have icons of Post, File, New Event, New Task, and so on. How we can add/delete/re-order the icons?
  1. Navigate to SetupCreateGlobal ActionsPublisher Layouts
  2. You can have many layouts assign to different Profile. Select a Global Publisher Layout by click Edit link
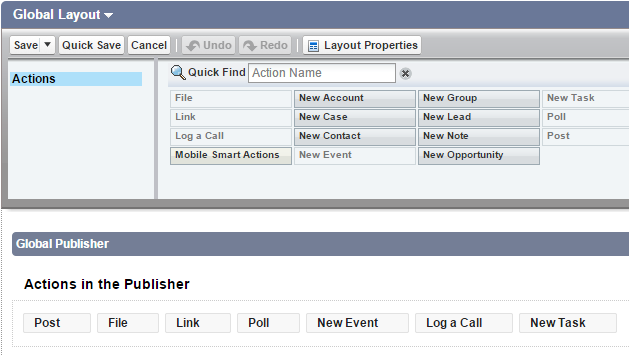
  3. You will see available Actions available. You can add, remove, and re-order by drag and drop the icon in the Global Publisher


Create custom object record using Action
By default, Salesforce provides more than 10 default Global Actions, including create a record for standard objects such as New Account, New Case, and etc., also Email and Log a Case.

If you have custom objects, you will not see New action for those objects. You need to create Global Actions for each of them. Let us go through a sample:
  1. Navigate to SetupCreateGlobal Actions | Actions
  2. Click New Actions button
  3. Assume the object name is Service, enter Action Information as the screenshot below
  4. You will notice New Service now available in the available Actions
  5. Edit Global Publisher Layouts and drag New Service into Actions in the Publisher
create global action

add action to global publisher layout

new action added to global publisher layout and appear in Salesforce app


Object-Specific Actions
There are five types of object-specific actions:
  • Object-specific actions create records that are automatically associated with related records. For example, you add an object-specific action on the Account object that creates contacts. If a user creates a contact with that action on the detail page for the Acme account, that new contact is automatically associated with Acme.
  • Object-specific update actions make it easy for users to edit records. You define fields to be available when user update the record.
  • Object-specific Log a Call actions let users enter notes about calls, meetings, or other interactions that are related to a specific record.
  • Object-specific custom actions are Visualforce pages or canvas apps that let users interact with or create records that have a relationship to an object record.
  • Send email actions, available only in cases, give users access to a simplified version of the Case Feed Email action on Salesforce1
The default Object-Specific Actions available are depends on the object itself, check out this matrix.


You can configure object-specific actions from the object page layout, example for Account:
  1. Navigate to SetupCustomize | AccountsPage Layouts
  2. Look for Salesforce Mobile and Lightning Experience Actions, by default it will be inherited from the global publisher layout, but you can overwrite by click link override the predefined actions
  3. Mobile Smart Actions will be added by default, see reference below for more information. 

If the object has Lookup relationship with another object, example: Area custom object has a lookup relationship to Region custom object. You can create a Global Action to create Area record and add this global action to Global Publisher Layout. When the user executes the action from mobile or from Lightning Experience, Region will be blank, so the user needs to enter the Region manually.

For the same Area object, if we create new Area action from Region object, and add this object-specific action to Region layout, Region will be auto-populated in new Area layout.

Note: you can add Global Action to object page layout.


Now, let's see how this work for objects with Master-Detail relationship.
1. You can't create Global Action for a custom object which is a child in the Master-Detail relationship.
2. Only object specific action can be created for this kind of object, the action will be created from the parent object.


Let's see a sample on creating object specific action and adding the Action to the object layout, in this sample we will create Service (child) from Opportunity (parent).
  • Navigate to Setup | Customize | OpportunitiesButtons, Links, and Actions
  • Click New Action button and enter Action Information
  • You can define fields visible when the user clicks the Action.
  • Navigate to Opportunities Page Layout, find Action created and drag to Salesforce Mobile and Lightning Experience Actions


This is how it looks when the user selects Action menu:


Opportunity Name will be automatically populated:


Last update: 20-Mar-2018


Reference:


Page-level ad