Pages

Showing posts with label List View. Show all posts

Tuesday, May 17, 2022

Salesforce: Retrieve List View columns and filters

Five years ago, I blog retrieving List View Sharing to get the list of users, groups, and roles that can access list views. This blog is to continue to get the columns and filters.

Open Workbench and from Rest Explorer, example: /services/data/v53.0/sobjects/Case/listviews/00B0o00000Fq3xQEAR/describe

Make sure to update the object name in red and List View id in orange.

To get the list of columns, click the "Show Raw Response" link. 
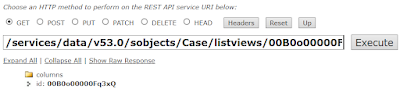

Copy the result of the column and use JSON to CSV tool to convert it into CSV or Excel file. Some of the columns here are added by the system and do not appear in the list view, such as Id, Record Type Id, etc.

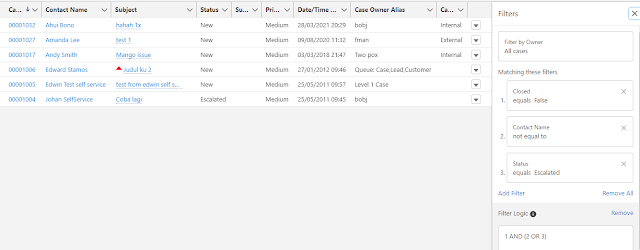
To get the filters; looks for the query underneath, this will also show the fields, filter, and order in SOQL format:

SELECT CaseNumber, Contact.Name, Subject, toLabel(Status), toLabel(Sub_Status__c), toLabel(Priority), CreatedDate, Owner.NameOrAlias, RecordType.Name, Id, RecordTypeId, CurrencyIsoCode, LastModifiedDate, SystemModstamp, Contact.Id, ContactId, Owner.Id, OwnerId FROM Case WHERE IsClosed = false AND (Contact.Name != null OR Status = 'Escalated') ORDER BY CaseNumber DESC NULLS LAST, Id DESC NULLS LAST

** Use toLabel(fields) to translate SOQL query results into the user’s language.

Here is the original list view:

Wednesday, January 6, 2021

Salesforce: Mass Close Case

Two years ago, I blog on using quick action to mass update a field from a list view, check out this blog. This blog is to use the same approach, but allow the user to enter data before doing the mass updates.

Use case: Universal Container would like to allow the Marketing team to do a mass close case, however, the user must enter a reason in a custom field before closing the case.

Inline editing support edit Status in the list view, however, the custom field for reason is a long text area field, which is not supported by inline editing, see this limitation here.

Solution: implement Quick action for List View

Note: I have seen many consultants customize this by using visualforce page and apex class which is not necessary and over-engineer, when click-not-code can achieve the same result and easier to maintain.


1. Create New Action

From the Setup menu, navigate to the Case object, look for the Buttons, Links, and Actions menu. Click the New Action button, enter/select the following values:


Add the custom field for reason and remove all other fields, make the field as required if necessary.


2. Add Predefined Field Values

Still in Mass Close Case action created, scroll down to Predefined Field Values section, then click the New button, enter the as below and save.


3. Add button to the layout

Stay in the Case object, click Search Layouts for Salesforce Classic menu, then click Edit under the arrow on List View. "Mass Close Case" should be available under "List View Actions in Lightning Experience"

Select the action and click the add arrow button.


4. Case tab

Click the Case tab, you need to select a view, except Recently Viewed. You should see the "Mass Close Case" button, you maybe need to click the arrow button to show the new button, if too many buttons added to the list view.


5. Select records

Select a list view, but not the default "Recently Viewed", then select multiple case records. Click the "Mass Close Case" button, you will be presented to enter a reason to close the case, this will update the Status and Internal Comments field for all Cases selected. Click the Save button, and then the OK button to confirm.


All Case Status updated to Closed and all "Internal Comments" with "PO created".

Friday, April 26, 2019

Salesforce: Account Hierarchy columns & Recently Viewed columns

Can we customize the Account Hierarchy columns?

Classic - NO
This is the article and this is the idea.

Lightning - YES
Here is the article and here the steps:
  • From Setup, at the top of the page, select Object Manager.
  • In the Account object, click Hierarchy Columns and then click the New button (if this never created), or Edit link to edit existing columns.
  • You can add up to 15 columns.


Once create Hierarchy Columns, the system will auto-create a list view called Org_Account_Hierarchy in Account. The list view will have the same column as fields added to Hierarchy Columns.
You can rename this list view, but not able to change the sharing setting (this list view is visible to all users). Deleting this list view will reset the Account Hierarchy columns back to the default. Updating columns on this list view will change columns in Account Hierarchy too.

By default -- no hierarchy column setup, account hierarchies display the same columns as the Recently Viewed Accounts standard list view. However, this Recently Viewed Accounts list view columns don’t change when you customize the hierarchy columns.


Recently Viewed
In Classic, when we click a tab, such as the Accounts tab, by default it will show "Recent Accounts" with columns defined in Search Layouts - Tab


While switching to Lightning, clicking the Accounts tab will bring open the "Recently Viewed" list view (if pinned list view has not changed), list view columns in "Recently Viewed" is defined in Search Layouts > Default Layout, you can edit to change columns to display, but you can't delete, change the visibility, or rename it.
You also can change columns to display for each profile, once configured, this will overwrite columns to display from the default layout.

However, there is another list view with a similar name but include object name in Lightning, "Recently Viewed object name"e.g. Recently Viewed Accounts, we cannot configure the columns for this view (as of Summer '20 release), and are unable to delete, change the visibility, or rename it. Check out this article for more information.


Reference:


Wednesday, March 7, 2018

Salesforce: List View Mass Action in Lightning Experience

In Spring ’18 release, Salesforce introduces Quick Actions in Lightning Experience on List View, but only applicable to Case, Lead, and custom objects only. With this user can do mass action on the selected records.

Use case: Universal Container would like to allow the Marketing team to mass update the Industry on Lead, rather than do it one by one. 

Inline editing in List View is a good option, however, inline editing does not support multiple record types in a list view, and not all fields are supported for inline editing, so creating a function to mass update would be preferred and faster.

Solution: implement Quick action for List View.

Note: this will add the button to all list views, except Recently Viewed, and you can't hide this button from a specific list view, or make the button only visible to a specific list view or user profile.


1. Create New Action
From the Setup menu, navigate to the Lead object, look for the Buttons, Links, and Actions menu.
Click the New Action button, enter/select the following values:


Add the Industry field and remove all other fields.


In some cases, you may need to Predefined Field Values for selected fields for users' productivity, but in my use case, it is not required.


2. Add button to the layout
Stay in the Lead object, click Search Layouts for Salesforce Classic menu, then click Edit under the arrow on List View. Change Industry should be available under "List View Actions in Lightning Experience"
Select the action and click the add arrow button.


3. Lead tab
Click the Lead tab, you need to select a view, such as My Unread Leads, or any list view created, except Recently Viewed. You should see the "Change Industry" button, you maybe need to click the arrow button to show more buttons available, this is because it only the first 3 buttons shown on the list page.


4. Select records
Select a list view, but not the default "Recently Viewed", then select multiple lead records, up to 200 records from the list view.
Click the "Change Industry" button, and select an industry from picklist values, this will update the industry from all Leads selected. Click the Save button, and then the OK button to confirm.


Now, all Leads selected earlier will be no longer selected and Industry value is updated.


Extra
If you would like to make "Banking" the default value, go back to your action, and set the Predefined Field Values.


Tuesday, October 3, 2017

Salesforce: Lightning Mass Inline Editing in List View

Many years back, when we are still in Classic, we can enable Mass Inline Editing from the list view, read this blog Inline Editing in Salesforce List View for more info. However, when switching to Lightning, inline editing for list view is not available.

Until Winter '18 release, Salesforce adds this feature in Lightning. I have a use case where the list view works in some object, but not for other objects, example: the checkbox at the left shown in Lead, but not in Opportunity. However, when switching back to Classic, the checkbox appear for Opportunity. For sure, this is not about menu setup issue as it works in Lead objects in Lightning.

Further check, here is the cause, the checkbox at the left for Lightning only appear when A or B scenario below is fulfilled:

A. You can inline edit the list
1. If you have record type configured, the list view should filter with only one record type, and
2. There are fields in the list view which is editable, such as: not created date, created by, etc, and
3. No "OR" filter logic in the list view.

B. Mass action button
You have mass action button added to the list view tab, such as "Add to Campaign" button.
But, keep in mind around, if your custom mass actions buttons are Javascript, they'll show up and work in Classic but will not be visible in Lightning, as there is no mass action for the list view, the checkbox will not appeared too.


Notes: mass inline edit in Lightning is auto enabled since Winter '18 release, and it does NOT need to enable Enable Inline Editing and Enable Enhanced Lists from User Interface setup menu.


ReferenceEdit More Records at Once with Mass Inline Editing


Page-level ad