Pages

Friday, December 17, 2021

Salesforce: Retrieve Report Metadata

Here is the use case, you are presented with a report with duplicate fields label, whether from the same object or different objects, but how can you easily identify each field? See a sample from the below screenshot, there is no way to tell which Created By and Created Name are from which object.


Even by editing the report, it will not tell you, of course, you can remove and add the fields back, but you are supposed not to change the report.


The answer is to check the metadata of that report, unfortunately, Salesforce does not offer to get this without using tools, such as VS Code or other IDE. But, we can use Workbench to retrieve it.

You can follow this blog to prepare the package.xml file, and retrieve the metadata using Workbench.

1. Get the "fullName"


The report should not be stored in the Private Reports folder, otherwise, you will not see the report here.

2. Prepare XML file

Copy the following XML and save it as a file called "package.xml"

<?xml version="1.0" encoding="UTF-8"?>
<Package xmlns="http://soap.sforce.com/2006/04/metadata">
    <types>
        <members>Johan_Change/Opty_and_Acct</members>
        <members>A_folder/Opportunity_by_Stage</members>    
        <name>Report</name>
    </types>
    <version>53.0</version>
</Package>

If you would like to retrieve metadata from multiple reports, you can add them to the XML file.

What is this mean <members>Johan_Change/Opty_and_Acct</members>

Text in red is the report folder API name, you can get the report folder API name from Folder Unique Name from rename folder. While the blue text is the report API name, you can get the report API name from the Report Unique Name in the report properties.

If the folder is Public Reports, use unfiled$public as the report API folder name in the Package.XML file, also you will not see that folder in Workbench step (1).


3. Retrieve Package

Open workbench:
  • select migration | Retrieve
  • select the XML file prepared in step 2
  • select "Single Package"
  • click the Next button then click the Retrieve button
  • when done, click the "Download ZIP File" link
  • extract the zip file and looks for the report
  • open the file with any text editor

<?xml version="1.0" encoding="UTF-8"?>
<Report xmlns="http://soap.sforce.com/2006/04/metadata">
    <columns>
        <field>Opportunity$Name</field>
    </columns>
    <columns>
        <field>Opportunity$Account</field>
    </columns>
    <columns>
        <field>Opportunity$CreatedBy</field>
    </columns>
    <columns>
        <field>Opportunity$CreatedDate</field>
    </columns>
    <columns>
        <field>Opportunity$Account.CreatedBy</field>
    </columns>
    <columns>
        <field>Opportunity$Account.CreatedDate</field>
    </columns>
    <currency>EUR</currency>
    <format>Tabular</format>
    <name>Opty and Acct</name>
    </params>
    <reportType>Opty_and_Account__c</reportType>
    <roleHierarchyFilter>CEO</roleHierarchyFilter>
    <scope>organization</scope>
    <showDetails>true</showDetails>
    <showGrandTotal>true</showGrandTotal>
    <showSubTotals>true</showSubTotals>
    <timeFrameFilter>
        <dateColumn>Opportunity$CloseDate</dateColumn>
        <interval>INTERVAL_CUSTOM</interval>
    </timeFrameFilter>
</Report>

The report metadata tell us that the 1st and 2nd field are from Opportunity, while the 3rd and 4th fields are from Account.

Here is the list of Metadata Type supported by Metadata API: https://developer.salesforce.com/docs/metadata-coverage

Some metadata types support using wildcard character (*), so you can retrieve all items without the need to mention each member name: https://developer.salesforce.com/docs/atlas.en-us.208.0.api_meta.meta/api_meta/meta_types_list.htm 

As you see from the above URL, Report and ListView are No, but Profile and PermissionSet are Yes.
Sample XML file:

<?xml version="1.0" encoding="UTF-8"?>
<Package xmlns="http://soap.sforce.com/2006/04/metadata">
    <types>
        <members>*</members>
        <name>PermissionSet</name>
    </types>
    <types>
        <members>*</members>
<name>Profile</name>
    </types>
    <version>53.0</version>
</Package>


Monday, December 13, 2021

Salesforce - Teams integration

Salesforce apps in Microsoft Teams allow you to searchmention, and preview Salesforce records in Teams chats between users, and Teams channel. Any Salesforce records, from Account, Contact, Opportunity, Case, Lead, etc. can be used for mention in chat and can be added as a tab.

Adding Salesforce records as tabs in the Teams allow you to:

  • View and edit record details
  • Access Chatter activities, including creating new posts
  • Access Activity histories related to the record
  • View the related records and open in Salesforce
  • Optionally, you can rename the tab name in Teams


Benefits

  • Convenient Data Sharing, you can share Salesforce records in your Teams channels and chats easily with the Salesforce Teams Integration. This enables you to start a conversation on any record. The members of your Teams channel who have the access to Salesforce can conveniently work and access Salesforce records without leaving Teams.

  • Convenient Data Access, the Salesforce - Teams integration enables your Teams users to interact with Salesforce records not only through conversations but also via channel tabs. Adding a Salesforce record as a tab allows users in the Teams can easily view details, related lists, activity timeline, and Chatter right in the Teams tab.

  • Salesforce Records Preview, if someone mentions a Salesforce record in a Teams conversation, the other users can easily preview the record without leaving Teams. As a result, users can save their time and avoid juggling between Microsoft Teams and Salesforce.

  • Editing Salesforce Records, don’t waste your time and do not jump from Microsoft Teams to Salesforce. You can edit the record details without changing your work environment to avoid the loss of any important updates.

Enable in Salesforce  

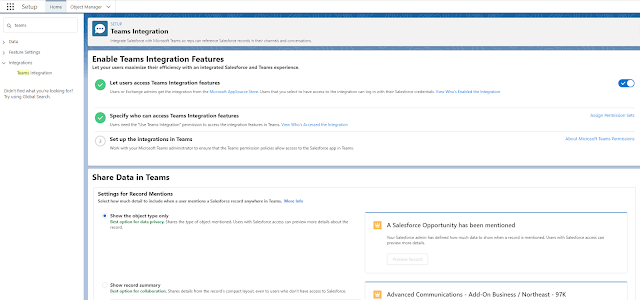
1. Go to setup menu and search for Teams Integration, then enable it. You may need to reach out to your AE to enable this feature.


2. Assign permission set called "Use Teams Integration" to users that need to access Salesforce data from Teams.

Adding the Salesforce app in Teams

1. Open Teams, click the Apps icon at the bottom left (1), type Salesforce in Apps search box (2), and click Salesforce icon (3) to install


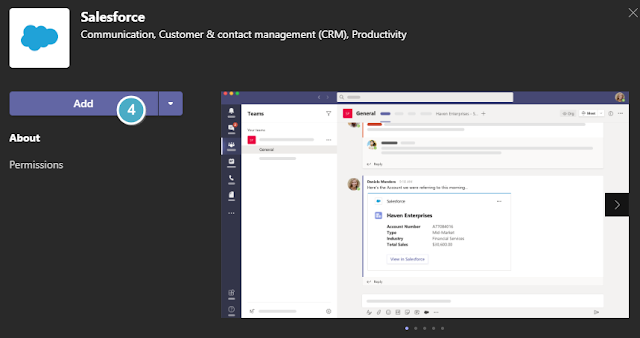
2. Next, click Add button (4)


3. From the login page, enter your Salesforce username and password.

4. Done, now you should see the Salesforce icon when a chat with someone, or in a team channel.


Search, mention, and preview Salesforce record in Chat

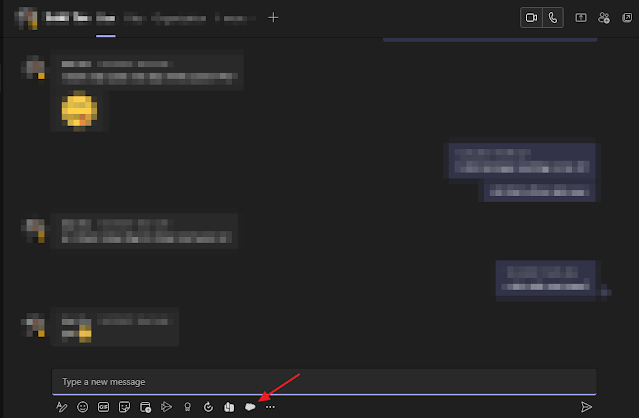
1. Open a chat window with someone and click the Salesforce icon

2. Search for a record, the system will show the recent records that you access in SFDC

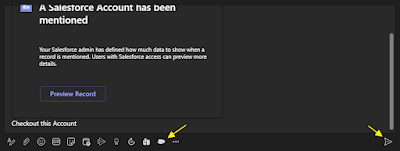
3. Select the record and click the Mention Record button

4. Type your message in the chat window then hit the “enter” key or Send icon


5. If the receivers have the Salesforce license and Salesforce app installed in Microsoft Teams, the users will be able to Preview the record sent, click “View in Salesforce” to open the record in Salesforce.com

6. The same action can be performed in the Teams channel under Posts, click “New conversation” button, and you will see the same set of icons as above screenshot


Adding Salesforce record as a tab

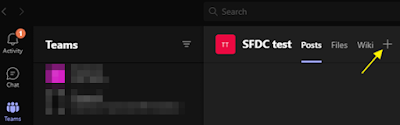
1. From a Chat or Teams channel, click + icon on the top 


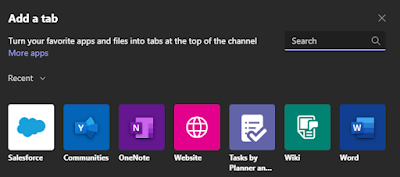
2. Click the Salesforce icon, if you do not see the Salesforce icon, type Salesforce in the search box at the upper right corner


3. Search for a record, the system will show the recent records that you access in Salesforce

4. Select the record and click the Save button

5. Click the arrow next to the new tab added, you can rename or remove the tab added

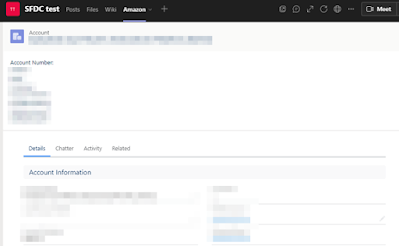
6. The selected record added as a tab in a Chat or Teams Channel


7. You will be able to edit the record, do Chatter posts, view Activity, see the Related records, click the link to open the related record Salesforce.com


Reference:

Thursday, November 11, 2021

Salesforce: Account Team List View and Opportunity Team List View

Many years back, we wrote a blog on options in reports to show the account team and in the opportunity team, the similar options are available in List View too, let's check out:

In the Account report type, we have the option to show:
  1. All accounts
  2. My accounts
  3. My accounts team's accounts
  4. My accounts team and my accounts
  5. My team's accounts

In Account list view:
  1. All accounts
  2. My accounts
  3. My accounts teams
The first two options are clear, show all accounts or my accounts.
"My accounts teams", is similar to "My accounts team's accounts" in the report type, where the result ONLY accounts where you are in the Account Team.


The same applies in the Opportunity Team list view too, in the Opportunity report type, we have:
  1. All opportunities
  2. My opportunities
  3. My team-selling opportunities
  4. My team-selling and my opportunities 
  5. My team's opportunities
  6. My team-selling and their opportunities


In the Opportunity List view:
  1. All opportunities
  2. My opportunities
  3. My opportunities teams
  4. My team's opportunities
The first two options are clear, show all accounts or my accounts.
"My opportunities teams" -- all opportunities where you are in the Opportunity Team, this is similar to "My team-selling opportunities" in the report.

"My team's opportunities" -- all opportunities owned by me and owned by users below my role hierarchy, including all that report to my direct reports.


Reference:


Sunday, October 24, 2021

Salesforce: Topic in Lightning

Topic is another Salesforce feature that is probably not as well-known, but with proper governance and maintenance, it can be a useful tool for organizing posts and records. Topics are case-insensitive. 

Where to add Topics?
The topic is enabled by default for Chatter Post in Lightning. The topic can also be enabled for objects; follow this link to enable it.

To add topics in a Chatter post:
  • start with # continue with the topic, for example, hello world, hit enter key then continue with the post, in this case, the topic is 2 words - hello world
  • You can have multiple topics in the Chatter port. 
  • As you type after #, the system will look for existing topics, and you can simply select the existing topic.
To add topics to a record object:
  • Do not need to start with a #; just type the topic and hit Enter when done. 
  • Need to type in the Topics component in Lightning. See the post below for the Topics component. 
  • You need to have edit permission on the record to be able to add topics to that record. 
  • Same with adding topics in the Chatter post, you can add multiple topics for a record, also as you type, the system will look for existing topics and you can simply select the existing topic.

If you open a topic, the topic in the Chatter post will show under Feed, while topics added to records will show under the Related tab.


Topics Component
Once you have enabled Topics for an object, you need to add the component to the Lightning page, so your users can use it.


Reporting
You can run a Topic report to view usage, including related records. You need to create a custom report type with Topic Assignment as the primary object.


If you do not have access to the record, you will not see the topic in the report either.


Search
You can search for a topic in the global search box; you do not need to add # before the topic. See the screenshot below; the one at the top is correct.


Deleting Topics
Only users with the Delete Topics permission can delete a topic; this applies only to topics related to a record (not to topics related to a Chatter post). Once the topic is deleted, topics added in the related record will be removed.


Remove Topic from a Record (Un-tagging)
This is just removing the tag from one specific record.

Example:
On Opportunity A, remove #DataQuality, the topic still exists. Other records with that topic are unaffected.

Who can remove a topic from a record?
  • The record owner
  • Users with edit access to the record
  • Admin
You do NOT need “Manage Topics” to remove a topic from a single record.


Reference:

Sunday, October 17, 2021

Tableau CRM: Getting Started with Recipe a.k.a Data Prep 3.0

Recipe has existed in Tableau CRM for a long time, but not really used a lot because Dataflow offers more powerful data transformation, although there are functions which only available in Recipe, such as Join. However, in the last few releases, Salesforce introduced a new term called "Data Prep 3.0", which actually is Recipe, and stop to enhance everyone's darling "dataflow".

When Data Prep 3.0 was introduced (I have no idea if there was Data Prep 2.0 and 1.0), it was not so popular because of the lack of functionalities, such as support to upload/download JSON, use SAQL, etc. Since then, in every release, more and more features are added to the Data Prep/Recipe, so it may be worth starting to look at it.

As per the Winter '22 release, at a glance, Recipe now looks quite promising, it supports many things: 

  • Download/upload recipe in JSON -- same with Dataflow
  • Formula with query -- comparable with computeExpression in Dataflow
  • Multiple row formula -- comparable with computeRelative in Dataflow


Here are things that are better in Recipe compare to Dataflow

  • Join (Left, Right, Inner, Outer) -- this is not available in Dataflow
  • Preview -- we cannot preview data in Dataflow
  • Layout stay when save -- you need EADashboardHelper in Dataflow
  • Multiple actions in a Transform node -- less node compare to Dataflow
  • Aggregate
  • Sentiments, Predict Missing Values, Cluster
  • Trim, Substring, Split, Uppercase, Lowercase, Replace -- some of them can be achieved with computeExpression in Dataflow
  • Format Dates, Bucket, Edit Attributes

Here are things that can be improved in Recipe
  • Ability to re-order items in Transform node 
  • Ability to re-order column in Preview data
  • Ability to sort and filter Preview data
  • Running a recipe does not show details in Monitor

A sample of Recipe


Formula in Transform node is based on TCRM SQL, so this is not SAQL, or SOQL.
for example: SQL
case 
when LeadSource = 'Partner' OR  LeadSource = 'Web'
then 'Partner Web'
else LeadSource
end

for example: SAQL
case 
when LeadSource == "Partner" OR  LeadSource == "Web"
then "Partner Web"
else LeadSource
end


Direct Data in Recipe

Winter '22 release also make Direct Data in Recipe become General Available. With Data Direct, you can access Salesforce live data in the recipe, not accessing data stored in Tableau CRM via sync. However, but sync needs to be enabled in the Tableau CRM to use this.

Another catch is, you cannot use direct data when the object has been sync to Tableau CRM, example: you have dataflow or recipe that sync Opportunities, then Opportunities will no longer be available for Data Direct, which is quite sad, sometimes we need to access the real-time data directly, not "obsolete" stored data in Tableau CRM.

When I search "Opportunity". because the opportunity object already syncs in Tableau CRM from other dataflow/recipe, it will only be available via Connected (in yellow), not Direct (in green)


If you have more things that not cover here or the information shared here is wrong, feel free to comment on this blog or reach me.


Wednesday, October 13, 2021

Salesforce: Email Template with Hyperlink

We shared about the Lightning Email Template seven months ago, as you read, it is easy to create an email template with merged fields, such as Account Name, Opportunity Name, etc.

However, those merge fields are not clickable (not hyperlink), so if the email sent is to your internal Salesforce users, it will be ideal if recipients are able to open the link directly from the email received.

Let's do a quick hands-on, in this example, I would like to build an email template for Case, contain 2 hyperlinks:

  • Case Number, to open the case
  • Account Name, to open the Account in the case

Here is the step:

1. Create the email template 

Create the email template as per normal, add all merged fields needed


2. Case Number hyperlink

Open a case from your browser and grab the URL and copy to a text editor, for example, https://d90000000ky88eag.lightning.force.com/lightning/r/Case/50090000001O98rAAC/view

Change the Case ID (as in red) and replace with {{{Case.Id}}}, now we have https://d90000000ky88eag.lightning.force.com/lightning/r/Case/{{{Case.Id}}}/view

Copy the above URL, select {{{Case.CaseNumber}}} from the email template, then click the Link icon (2nd from right) and paste the URL above (in the yellow background) here, then click the Save button.


3. Account Name hyperlink

Repeat the same for Account Name, get the URL and change the Account Id, so it will look like
https://d90000000ky88eag.lightning.force.com/lightning/r/Account/{{{Case.AccountId}}}/view 

Copy the above URL, select {{{Case.Account__c}}} from the email template, then click the Link icon (2nd from right) and paste the URL above, then click the Save button.

If you notice I use Case.Account__c, this is simply telling that I have a formula field in Case to get Account Name from AccountId.


4. Sending Email

Open a case and click the Email tab, select the email template created, and notice the email body is auto-populated with hyperlinks.


Reference:


Page-level ad