Pages

Thursday, April 23, 2020

Einstein Analytics: Parent with and without Child dataflow

This is regarding the parent-child relationship.

So here the needs:
  • if 0 child found --> 1 row
  • if 1 child found --> 1 row + child fields
  • if >1 child found --> number of child row + child fields 

Is there a way to achieve the following in Einstein Analytics dataflow?

In Salesforce, this is pretty easy using a report type:


But, Einstein Analytics is a different story. The granular level should come from an object. However, we always can find ways to get things done.

So here is the solution by Roman Michalik from Salesforce:
  • It's starting at the Child level and giving you one row per child. 
  • Then it's checking for additional parents and adding those parents to the list (with blank child fields).


Here is the sample JSON for dataflow.


Another option is to use Recipe with Left Join.


Reference:


Tuesday, April 14, 2020

myTrailhead Introduction

My experience and journey with myTrailhead

Rebecca “Becky” Sweetman, Global Business Operations Manager, Adstream
Salesforce Singapore User Group and SG Women in Tech member
www.linkedin.com/in/rebeccasweetmanSG
Twitter @BeckySweetman3


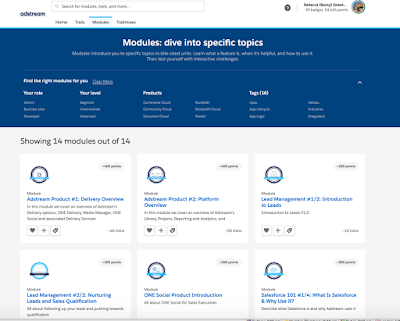
What is myTrailhead and how it is different from Trailhead?


myTrailhead is a modern gamified online learning enterprise platform tailored for your company that allows you to leverage the power of Trailhead. It allows you to create personalized self-paced integrated learning journeys, efficient and consistent onboarding - reducing ramp-up time to accelerate time to revenue - increases employee productivity, drives adoption of resources to maximize their investment, and cultivates a developmental company culture. It isn’t just to train Salesforce tools either, as we use it for internal training of our own products and services, soft sales skills, etc. I also use it to manage  Salesforce releases and introduce the tools that matter to them. 

Users can proudly show off badge-swag on their profile and analytics can show the best and most diligent learners. Internal badges will only be visible inside myTrailhead, not on the public site.

You will require at least a standard Salesforce user license (sales cloud, service cloud or platform) and then an added myTrailhead license. The charge comes per user as a package and that is the only fee - except if want to add on Premier Support. The advertised price is $25 USD per user per month annual billing. $2/login or $5/member for Customers and Partners

myTrailhead uses a separate personal domain to Trailhead for user access and uses a connector user in Salesforce to send analytical data to Trail Tracker. Users login with Salesforce credentials to this domain but auto-links with any pre-existing Trailblazer.me so everything is retained in one place and you will still retain and view your ranks, points, and badges in one profile.


myTrailhead Features

myTrailhead comes with its own set of features that work together with the Salesforce platform.
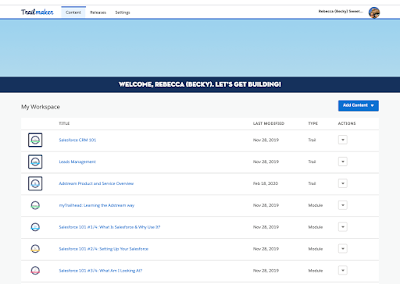
Trailmaker is the tool to create, preview and release the content. You can have as many users access content creation as you wish as this is not limited and just a matter of permission sets.

myTrailhead has the ability to embed videos, images, and tables, and you can easily copy/paste your content. It also allows you to add quiz questions. For anyone familiar with Trailhead – it is basically, the same format.

You can use Trailhead content in Trailmixes to publish inside trails too, but these cannot be modified further. Trailmixes can also link to external content hosted elsewhere to bring this into your training journey.

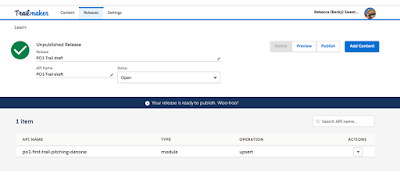
Trailmaker allows you to preview your content and send it to others to view prior to publish and you can easily add, delete or update the content at any point in a separate Releases tab. In this tab, once you easily upload your content to the Release it will inform you of any errors (cannot publish with these) or warnings (not ideal but will still allow you to publish) prior to publication. 


Same as in Trailhead, users can track their own way through the modules and trails with a countdown of time left until completion. 

You or anyone you give permission rights to can add your own company logo and banner to myTrailhead and add your brand’s color so it feels familiar and personalized for you. 

You will need to create your own badge art which can be stored in the Documents object (accessible in Classic only right now). You can assign modules (badges) and Trailmixes. This enables it to come upfront and center on their myTrailhead home page and once complete will show in your reports.

Trail Tracker is your tool to track completion for users, and it syncs daily at a time of your choice. It also comes with a set of standard Reports and Dashboards which you can customize. Examples include Total Number of Badges Assigned, Number of Badges Awarded This Month and a Leaderboard of Badges and Points.

You can also add the badges component to Profiles for users and their managers to see their progress.

Finally, you can use the power of Process Builder to set up and automate an onboarding or learning journey for your users. 

Your users can also access myTrailhead from the Trailhead Go app for training on the run, currently available for iOS devices only.


Tips and Recommendations

This tool works perfectly for our global workforce and their training needs. However, here are a few tips and gotchas I wished I had known at the start of my journey configuring and using myTrailhead.
You do not need an implementation partner. It is very easy to enable and set up myTrailhead. As soon as your contract is signed you just need to wait for an email from them directly. You also need to install Trail Tracker with the use of a connector user. The time resource is in the content creation itself and adapting it for the system.

As previously mentioned, permissions are all done through permission sets in Salesforce. You can give certain users permission to also preview content prior to go-live for that particular trail or module and permission to add or change your branding. No extra cost or limits on numbers of each of these.

Onboarding them I found a little more complex.  The users don’t automatically get an alert when they are assigned permissions of course, nor to introduce them to the myTrailhead system and if they are not already set up in Trailhead, you need to wait for them to login and add their own profile before you can assign anything or the assignment sync will fail for them. You also will not know they have created this profile unless they tell you. The best steps I found for this process is: 
  1. Offer users to login to your myTrailhead link
  2. Have them login with their own Salesforce credentials to enable the connection to both systems (not to login with just their email or will just set up a public profile and won’t link the permissions).
  3. Set up their own profile (if they do not already have a Trailhead profile)
  4. Then inform you so you can assign to them with Trail Tracker if applicable
You can assign in bulk using Trail Tracker but if one person is not set up it will fail all. Refer to your included “Debug Log” report to view any sync errors. 

myTrailhead is not a traditional LMS, it is a learning experience system LXP, so you cannot use LMS files and may have problems shifting from a different LMS system, but it does hold videos, tables, images and links to other hosted external content. Because of this, it is best to get executive buy-in straight away and make the content creators realize this is not a system to throw just bullet points and PowerPoints, this is a journey and the content should be in the format of the story with examples, not short form. I find the best thing to do is have them set up and undertake a module in Trailhead to gather what the journey will be like.

myTrailhead is not a high maintenance system for admins, but the content creation often takes a lot of time, so prepare the team for this resource outlay. Also, have someone available to edit it for voice and spelling/grammar and make sure objectives given to meet the content and questions. Also, schedule a regular session to update and add new content so it does not become stale.

For content creation, you need to use your own version control or content management system such as Quip or Google docs to keep up with changes and involve others then update content in myTrailhead. This is not provided with myTrailhead, although you can download ‘backpacks’ of your files for backup and make changes and re-upload.

It is easy to copy/paste directly into Trailmaker but there are only one font and 2 sizes (header and body text).

API names for each unit, module, and trail need to be unique across all of Trailhead or errors may show.

Badge art needs to meet certain specs and as you use a URL to add it to Trailmaker if the URL is not shortened it can send an error and not sync. Use Bitly or similar to shorten the link. There is a myTrailhead Badge Style guide here: https://success.salesforce.com/_ui/core/chatter/groups/GroupProfilePage?g=0F93A0000009W5F&fId=0D53A00004Y3PYH

If you deactivate a user and reactivate them, all their badges will still be retained.

You can set internal Trailmixes which will not be seen in public Trailhead, however, you cannot yet set controls around who can see or do these in myTrailhead – so, for example, anyone with a myTrailhead license in your company can search for or find a module and do the training. They will come up in reports that they have completed it, whether assigned or not.

Make use of automation like Process Builder and add badge recommendations to the in-app guidance.

It is still early days in myTrailhead, only launched last year, so flexibility in the tool can appear to be a bit limited. For example, you cannot change role, level, tags, products, etc. in the modules, but these are on the roadmap. There is no Playground as they have on Trailhead, but it is on the roadmap. Also, Trail Tracker only syncs once daily at this stage but looking forward to when we can get it on demand.

Reports will pull all Trailhead and myTrailhead data to reports for you. Filter on namespace or URL subdomain value to get internal-only data. For managers to see the report data you need to give them at least read access to Trailhead-related objects and user data.


Further Information and Training

Search for “myTrailhead Basics” Trailhead Trail


Quip doc for myTrailhead and Trail Tracker: https://www.quip.com/IthKAuemOn5O/myTrailhead-External-FAQs

Separate logging of support cases (although some cases need to route through usual Salesforce help) https://trailhead.salesforce.com/help


This is just the beginning of our journey with myTrailhead. I am always keen to talk to others and hear tips and recommendations from those with similar or other experiences. Please feel free to reach out to me on LinkedIn, Salesforce Community or Twitter.


Happy Trails! 
Becky.


Sunday, March 29, 2020

Salesforce: EmailMessage object

When Enhanced Email is enabled, Salesforce will create EmailMessage object. Emails sent from Salesforce are saved as Email Message records and Task records. There is a link from the Email Message record to a Task record, which is ActivityId field.

If you use the Outlook panel (and without enabling EAC), you can "Log Email" manually to Salesforce for email received and sent out. Both emails received and sent will be stored both as EmailMessage (prefix 02s) record and Task record (prefix 00T).

How to differentiate emails sent from Salesforce and manually logged from an email client?
You will not find any difference on the Task object, both Type and TaskSubType will populate with "Email". But there are some differences in the Email Message object. Check out this query:
SELECT Id, ActivityId, FromAddress, ToAddress, FromName, IsClientManaged, MessageIdentifier, Subject, TextBody FROM EmailMessage


Row 1,4,5 - email manual log from Outlook
Row 2,3 - email sent from Salesforce

As you can see, IsClientManaged and MessageIdentifier are different.

Note: using the legacy My Email to Salesforce service (BCC) will not create Email Message records, but only Task.


Email in Lightning activity component
All emails logged to Contact or Lead will be shown in the Lightning under the activity component.

For emails manually logged and sent from Salesforce, clicking the email will open the EmailMessage record, and you will be able to Reply All, Reply, or Forward the email from that panel. Hover mouse over the email will show the URL where it will be landed, for example, https://mydomain.lightning.force.com/lightning/r/02s2H00001BMfIgQAL/view


For email from BCC email services, clicking the email will open a Task record, there is no option to reply, reply all, or forward as the record is a task. Hover mouse over the email will show the URL where it will be landed, for example, https://mydomain.lightning.force.com/lightning/r/00T2H00007KIQvsUAH/view


For EAC email, clicking the email will open the email in that panel, you are also able to Reply All, Reply, or Forward the email from that panel. The system also shows if the email is shared with everyone or a group or not shared. Hovering the mouse over the email will not show any URL, click "View full email" will open the full email as an email stream.


Reference:


Monday, March 23, 2020

Einstein Analytics: using Flatten node to get Account Parent

Here is our scenario, we have multi-level account hierarchy, the sample of accounts for this blog:


Use case 1: display all child accounts (including top parent account) and their opportunities when the top parent is selected.

Dataflow:


We need to manually edit the Flatten node from JSON, by default, the Multi Field and Path Field fields are created as system fields, which aren’t visible in the user interface. To make the fields appear in the user interface and dataflow, add a schema section to the flatten transformation and set the IsSystemField metadata attribute to false for each field in the transformation.

"Flatten_UltimateParent": {
    "schema": {
      "objects": [
        {
          "label": "Flatten_UltimateParent",
          "fields": [
            {
              "name": "UltimateParentPath",
              "label": "UltimateParentPath",
              "isSystemField": false
            },
            {
              "name": "AccountParentIds",
              "label": "AccountParentIds",
              "isSystemField": false
            }
          ]
        }
      ]
    },
    "action": "flatten",
    "parameters": {
      "include_self_id": true,
      "multi_field": "AccountParentIds",
      "path_field": "UltimateParentPath",
      "source": "getAccount",
      "self_field": "Id",
      "parent_field": "ParentId"
    }
  }


Unfortunately, we will not see the schema in the dataflow UI.

We also need to Connect Data Source between Account and Opportunity using the Ultimate Parent Name.


Here is the dashboard:


Note:

1) Multi_Field from the flatten nodes will contain self Account Id (we select "Include Self ID" in the flatten node) and all the parents' Id.

Notice that top Parent Id 0018000001BNnOPAA1 is stored in ALL hierarchy, while Account F Id only stored on itself Account F and it child Account G. Don't be trick when AccountParentIds only show 1 value, because this is a multi-values field.

2) Path_Field will show all hierarchy from self Id, up to parent Id, and all the way to the top level.

* I use "Image" (under Show Data As) to show the full length of field content of UltimateParentPath column


Use case 2: display all accounts (including the child accounts) and their opportunities (including from their child accounts) when an Account is selected, the account could be on the top, middle, or bottom level in the account hierarchy.

Dataflow: let us modify existing dataflow to below:


We just need to add an augment node Account Name from Multi_Field AccountParentIds.


You also need to Connect Data Source between Account and Opportunity using the Account Parent Name from the augment node.


Here is the dashboard:


When select Account F, the dashboard will filter to Account F and the child accounts.


Referenceflatten Parameters


Saturday, March 14, 2020

Einstein Analytics: Dataflow Performance Best Practice

Performance is critical for Einstein Analytics dataflow, e.g. an optimized dataflow may take only 10 minutes, while the same dataflow with a poor design may take 1 hour (this includes sync setup) to run. Therefore, without great architected dataflows, it will be hard to maintain and sustain Einstein Analytics as a whole, as the company evolved.

Here are a few items noted based on my personal findings/experience, if you have additional inputs or a different perspective, feel free to reach me.


1. Combine all computeExpression nodes whenever possible

image-1


image-2

calcURI node in image-1 contains 1 compute field return Numeric, the same for calURI2 node also contains 1 other compute field return Numeric, a total of calcURI1 + calURI2 = 3:41 sec.

In image-2, we combined both compute fields into calcURI node, and it only took 2:0 sec.


2. Do compute as early as possible, and augment as late as possible

The rationale behind this is, compute node will process lesser fields before augment (as augment always adding fields to the stream), unless you need the field from the augment node for computation.


3. Remove all unnecessary fields 

Remove all unnecessary fields with a slice node or not to include the unnecessary fields when do augment from the right source. The more fields are handled by each node, the system will need more power and time to process, so slice out unnecessary fields if they are not needed in the dashboard or lens. 

Register node usually takes much more time when you write lots of fields, so always clean up before registering to a dataset.

image-3

Notice that calcURI3 in image-1 and image-2 took around 2:08 sec. In image-3, we add a slice node before calcURI3 to remove unnecessary fields, this reduces the number of fields processed in calcURI3, therefore it took only 1:55 sec.


4. Combine all sfdcDigest nodes of the same object to a node, if sync is not enabled

For some reason, your org. maybe not enable for sync, this does not mean you "must" enable straight away, and please DO NOT enable it without a complete analysis, as this may cause data filtering issue.

You should combine all sfdcDigest nodes of the same object into a node, imagine if you have 10 millions row of opportunity, every sfdcDigest nodes take 10 minutes (as an example), and if the dataflow designer adds 3 sfdcDigest nodes of opportunity, the data retrieve itself will need 30 minutes.


5. Do not perform Null check on filter node
So instead of having something like 'Check.Id' is null in SAQL filter, create a computeExpression node to have a Yes/No compute field, then filter with CheckIdIsNull:EQ:Yes
Filter node with Null check will take a lot of time when the dataflow runs.


6. Remove unused Register node
Many times, we add Register nodes across dataflow for testing/debugging, but once deployed to Production, make sure Register nodes for testing are removed. Register nodes will take quite some time of the dataflow run, depending on the number of fields and rows.


7. Remove all nodes that are not related to a Register node
These nodes are simply useless.


8. Use Source Field in computeRelative node, not SAQL, whenever possible
Check out this blog.


Thursday, March 12, 2020

Einstein Analytics: Precision and Scale

Precision and Scale are important and required for computeExpression node that returns Numeric in Dataflow, otherwise, your dataflow rum will fail.

For numeric, as per this article External Data Metadata Format Reference
  • precision: the maximum number of digits in a numeric value, includes all numbers to the left and to the right of the decimal point (but excludes the decimal point character). Value can be up to 18.
  • scale: the number of digits to the right of the decimal point in a numeric value, must be less than the precision value.

But in short:
  precision: must be 1 - 18
  scale: must be 0 - 17 and less than the precision value


Let us see how this works in reality. I'll do a few same calculations on computeExpression, but with different precision and scale, the formula is A/B for all calculations, here is the result:


Calc_10_5 mean, precision = 10 and scale = 5, and etc. At a glance, you may think that all decimal points do not exist, this is incorrect as you need to "format numbers" on the widget or metadata.

For this blog testing, I set 5 digits decimal point:


Here is the result after all fields set with 5 decimal points:


From the above table, "scale" shows the difference in the calculation result, the result will be round up or round down based on the decimal point defined in the scale.

Notice that decimal point "below 0.5" will be round down, while "0.5 and above" will be round up. But, if scale = 0, all decimal points will be round down, see calc_10_0.


Reference: External Data Metadata Format Reference


Page-level ad