Pages

Showing posts with label Salesforce1. Show all posts

Tuesday, March 20, 2018

Salesforce: Mobile Smart Actions

Mobile smart actions are quick actions that are available for Account, Case, Contact, Lead, Opportunity, custom object page, and also in the global publisher layout. The purpose of this action is only for Salesforce mobile app. Mobile smart actions don’t appear in the full Salesforce site, regardless of which page layouts you add them to, they appear only to users in the Salesforce mobile app.

Mobile smart actions appear as a single action element in the page layout editor. However, they appear as many actions in the action bar in the Salesforce app. The bundle of actions element is varied on each supported object, example: you will see New Opportunity in Account, but not in Contact. You can refer all actions available in Mobile Smart Actions from this document.

You can’t change which actions are included as part of a mobile smart actions bundle, example: you would like to remove New Event action from Case, the solution for this is to remove Mobile Smart Actions, then add the individual actions in the object page layout or Global Publisher layout.

If you have the individual action such as New Task in Salesforce Mobile and Lightning Experience Actions page layout for Account, then you also have Mobile Smart Actions for the same Account layout, New Task will appear twice in the Salesforce mobile app, but only one New Task in Lightning Experience.

New Task appears twice in mobile app


New Task appears only once in Lightning


ReferenceMobile Smart Actions


Monday, March 5, 2018

Salesforce: Global Actions in Salesforce mobile app

This blog is a continuation from previous blog Salesforce Global Actions in Lightning, the same Global Actions added to the page layout will appear Salesforce mobile app in Chatter and Today page.

Side note: since Oct 2017, Salesforce1 mobile app has been renamed to Salesforce.

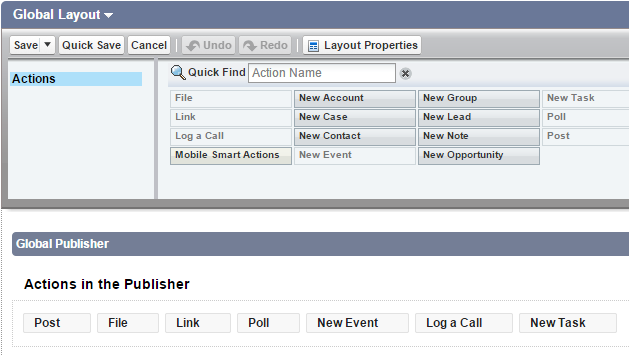
We will use the same page layout with global actions added in the previous blog for Lightning. From below screenshot, the actions in yellow are shown in Lightning, while the actions in green are Standard Chatter actions.


Let us see how they appear in Salesforce mobile app.


Now, we see all actions in Salesforce mobile app, including Standard Chatter actions: Post, File, Link, Poll, Question, and Thanks.

All other actions are shown in Lightning also available in Salesforce mobile app. The same for New Account action, because this org. have record type for Account, this default action will not show in the mobile app too, we cannot select record type when creating a record using Action.


Reference:


Thursday, March 1, 2018

Salesforce: Account Logo

Salesforce offers Account Logo for the US-based company in Salesforce mobile app and Lightning Experience since Summer 16 (beta) and becomes GA in Winter 17 release.


This feature needs to be enabled from Setup menu, looks for Account Settings, then select Enable Account Logos.

Users will be able to remove the default logo or provide feedback on the logo. If you remove the logo, other users will no longer see it, but you can’t undo this action, so remove with care.


One more thing to note, if you already use Salesforce for sometimes before enable Account Logo feature, all existing Accounts will not have Logo, only the one created after feature action may have a logo, Salesforce support mentioned this is working as per design.

However, there is no more enhancement of this feature since Winter 17 till now, there are many things can be enhanced, such as:
- Allow user to re-add logo removed
- Allow user to replace the logo on their own
- Allow user to upload logo to any Account and Lead
- Allow system to scan all existing accounts and add the logo

If your company looking into this, I think building custom Lightning component is the option for now, and you can vote this idea Customize Account Logo and this idea Allow custom contact photos and account logos not just social profile photos.


Reference:
- Get the Complete Picture with Account Logos (Generally Available)
- Enable Account Logos


Sunday, May 28, 2017

How to turn off Salesforce mobile app

Salesforce1 app is nice, it gives you access to your Salesforce data and application with no cost and lower effort to configure. But in some organization, it has to be off due to compliance guidelines or security protocols, administrators may be asked to prevent all User from accessing the Salesforce1 platform.


To completely eliminate your Users' ability to access the Salesforce1 interface, you will need to make the following changes:

1. Connected Apps
Navigate to Setup | Apps | Connected Apps | Manage Connected Apps, click Edit link on Salesforce1 for AndroidSalesforce1 for iOS, and Salesforce1 for Windows.

Ensure that the 'Permitted Users' value under 'OAuth policies' is set to 'Admin approved Users are pre-authorized', and click Save.


2. Deactivate from User Profile
Navigate to User Profile and ensure that the 'Salesforce1 for Android', 'Salesforce1 for iOS', and 'Salesforce1 for Windows' permissions are all disabled under the "Connected App Access" section. Once all of these have been disabled, save the changes for the Profile and repeat these steps for all Profiles in your organization.


3. Salesforce1 mobile browser app
To ensure that your Users are not able to access the browser-based version of Salesforce1, navigate to Setup | Apps | Mobile Apps | Salesforce1 Settings. From here, ensure that the 'Enable the Salesforce1 mobile browser app' option is unchecked, and click Save.


Now, let's see what happened when user login to Salesforce1


Next, we need to enable Salesforce1 for a few users to test if Salesforce1 can be approved as the corporate-wide app. There are 2 options:

1. Profile
If all the users are located under the same profile, open the profile and look for Salesforce1 under 'Connected App Access'.

2. Permission Set
This would be more flexible as you can enable it user by users across profiles. Ideally, you should create new Permission Set, click 'Assigned Connected Apps', click Edit button and look for Salesforce1 for... and lastly assign the permission set to the users.


Reference: Salesforce1 - How to Prevent all Users from Accessing the App


Sunday, October 25, 2015

Test Salesforce Mobile App with one/one.app

Before Winter '16 release, we can use one/one.app append to the web browser URL to test or to demo Salesforce1 mobile app without need to use mobile device, as long as select Enable the Salesforce1 mobile browser app, from Salesforce1 Settings setup menu, example:
https://na3.salesforce.com/one/one.app. But since Winter '16 release, which introducing Lightning Experience, using the same method will give you error message You can't access Lightning Experience (if you have not enable Lightning Experience).


But, if you have enable Lightning Experience, with above URL, it will re-direct to
https://na3.lightning.force.com/one/one.app and bring you to Lightning Experience UI.

So, how to test Salesforce1 mobile app from web browser since Winter '16 release?

1. Developer tool
Use latest version of Google Chrome (as of now version 46) or latest Opera web browser (as of now version 32) -- do you know that Opera is using Chromium engine? Login to Salesforce and select Developer tools.


Change the URL with one/one.app, example: https://na3.salesforce.com/one/one.app, you can select a mobile device type here.


Note: you still need need to select Enable the Salesforce1 mobile browser app, from Salesforce1 Settings setup menu to use Developer tools.


2. Chrome browser extensions
There are a few Chrome browser extensions available for free to emulate Salesforce1 mobile app.

S1 Demo
This extension adds a small phone icon in the omnibar if you are on a current salesforce.com instance. Clicking the phone icon will open a window with roughly the same resolution as an iPhone 5 to the one/one.app for that Salesforce instance.  Handy for doing quick demos of Salesforce1 mobile applications on a desktop browser. The extension work in both "classic" and the Lightning UI.


Mobile User-Agent
Once this extension installed and enabled, you will notice a new icon with mobile image added to Chrome browser bar, click the icon will change the color to orange, but nothing else obviously change. With Mobile User-Agent enabled, you still need to change the browser URL to one/one.app, example: https://na3.salesforce.com/one/one.app, you will notice it does not bring you to Lightning Experience UI anymore.


Salesforce1 Simulator & Salesforce1 Sandbox Simulator
You need to run this simulator from Google App Launcher, as the name said, Salesforce1 Sandbox Simulator use to login to sandbox instance, while the former one for Production instance. You need to login to Salesforce from simulator with your normal Salesforce credential.


Reference:


Wednesday, August 5, 2015

Setting up Passcode in Salesforce1 mobile app

If your organization is using Salesforce1 app, as admin, you can enable additional security layer when user access Salesforce1 app. Salesforce1 app offer Passcode capability for iOS and Android devices, where user have to enter passcode when open the app or idle for 1 to 30 minutes.


Once this is configured, user will be asked to enter and verify their own PIN when open the app for the first time, the length can be 4 to 8 digits.


How to setup Passcode?
  1. Go to SetupManage AppsConnected Apps
  2. Click Edit link for Salesforce1 for Android and Salesforce1 for iOS
  3. Look for Mobile Integration and set Require PIN after and Pin Length


Require PIN after specifies how much time can pass while the app is idle before the app locks itself and requires the PIN before continuing. Allowable values are none (no locking), 1, 5, 10, and 30 minutes. This policy is only enforced if a corresponding Pin Length is configured. 

Pin Length sets the length of the identification number sent for authentication confirmation. The length can be from 4 to 8 digits, inclusive.


Reference:


Tuesday, June 30, 2015

Salesforce: Compact Layout

Compact layouts are used to display a record’s key fields at a glance in Salesforce1 app. Using compact layouts, we can indicate which fields should appear in a record’s highlights area. These layouts were designed with touchscreen mobile devices in mind, where space is limited and users need to find important information quickly.

We can include up to ten fields, but only four of those will appear in the record highlights on a mobile device. The 1st field will be show as title at the top of the page in a larger font than the rest of the page, the 2nd-4th fields will be show under the first field separate with dot.

Sample of Compact Layout setup for a custom object called Kota


This is how it looks like in Salesforce1 app.


Instead of the record name, since we put Type 1 as first field, so Type 1 will be the title.


Few notes for Compact Layout:
  • Each record type can have only one compact layout assigned to it. However, a compact layout can be associated with multiple record types, no assignment by Profile in the Compact layout.
  • Users who don’t have access to certain fields in Salesforce won’t see them on the compact layout.
  • A compact layout must contain at least one field.
  • A compact layout can only contain fields from its object. This can include a formula field that is a cross-object reference to another object.
  • Removing a field from a page layout doesn’t remove it from the object’s compact layout. The two layout types are independent.
  • In the full Salesforce site, compact layouts determine which fields appear in the Chatter feed item that appears after a user creates a record with a publisher action, this will not happen when user create the record from Salesforce website, or even from Salesforce1 app with New button. This also doesn't related to Feed Tracking.

Reference:

Sunday, May 3, 2015

Salesforce: New Task Action Layout in Salesforce1 app

Recently, we confuse when New Task layout for Action is different with the one we define in the Salesforce setup menu - Setup | CreateGlobal Actions | Actions, click Layout link in New Task.

Here is our New Task layout for Action:


If we check from Chatter Feed action, the layout is correct:


Then we continue to verify in one/one.app simulator, and it is also correct there :


But, when test from Salesforce1 app in mobile device (iOS or Android), the layout order is different. Although all the fields defined is still there, but Subject will always at top, continue with Details and etc, even Subject is not defined at top in the action layout. Here how it looks:


Caused and Solution
Finally, we found it caused by a checkbox in Setup | Customize | ActivitiesActivity Settings, there is an option of Show simpler New Task form in Salesforce1. If this option is enabled, you will see New Task in Salesforce1 app in mobile devices as above.

You can simply deactivate it and the layout will be back as defined in the action layout.


ReferenceCreating Tasks using the Salesforce1 app


Thursday, April 23, 2015

Report in Salesforce mobile app

Since Spring '15 release, with Salesforce1 app version 7.1 and above, you can access Reports from Salesforce1 mobile app, in earlier version, you only have option to drill-down to report from dashboard.

From app version 7.1, you can access your most recently viewed reports right from the Salesforce1 navigation menu. You also still can access other reports by drill down from a dashboard.


If you do not see Reports menu, as system admin, you can configure it from SetupMobile Administration | Mobile Navigation.


All reports are shown in tabular format, with groupings added as columns to the end of the report. For example, on a summary report grouped by Industry and Type, those fields appear as the last two columns of the report. Reports with the joined format are not shown.

The Smart Search Items will show all objects to Salesforce1 app. This item also adds a set of recently-searched objects to the Recent section and adds "Show More", so users can access all the objects they have permission to use and that are supported in Salesforce1. If you don’t include this item in the navigation menu, users can’t access any objects in Salesforce1. 

Anything you put below the Smart Search Items element will appear in the APPS section of the navigation menu.


Reference:


Thursday, March 26, 2015

Salesforce1 Mobile app Simulator

In previous blog we discussed about what is Salesforce1 User, user with Salesforce1 checkbox ticked will access Salesforce1 from supported web browser from supported device.

When we untick Enable the Salesforce1 mobile browser app in Salesforce1 setting,
Salesforce1 User option in user detail will be removed.

But, on top of that, when you disable above setting, you will also no longer able to use Salesforce1 with simulator:
- one/one.app , example https://na3.salesforce.com/one/one.app, or
- extention/app for Google Chrome


You will get error message URL No Longer Exists


Reference: Salesforce1 Simulator using one/one.app


Wednesday, March 18, 2015

Salesforce1 User

For Salesforce Admin, when you create user, you may realize that I do not see Salesforce1 User field, but after save, in the user detail "Salesforce1 User" is automatically tick, and there is no way to set it untick by default.

Actually, what is purpose of checkbox "Salesforce1 User" ?
Many of us will think, if I untick the checkbox, that particular will not able to use Salesforce1 mobile app. But, the answer is NO.

So, what is this checkbox do?
It has nothing to do with user ability to use Salesforce1 mobile app. But if you aware of Salesforce1 Mobile Browser App, with this functionality turn on, if user using supported device in supported web browser, user will get Salesforce1 mobile app experience when the open Salesforce.com from web browser, without have to install the app in your device.

For complete list of devices with the web browser supported, click this link Requirements for Using the Salesforce1 App. Below screenshot of Salesforce1 app with mobile browser.


For user with Salesforce1 User disable in the user detail, when they login using web browser in mobile device, example: Safari browser on latest iPhone or iPad, user will see normal Salesforce.com, instead of Salesforce1 app user interface.

For admin who plan to turn off ALL users with Salesforce1 Mobile Browser App funtionality:
1. Navigate to Setup | Mobile Administration | Salesforce1 | Settings
2. Deselect Enable the Salesforce1 mobile browser app
3. Click Save

Once you deselect "Enable the Salesforce1 mobile browser app", option of Salesforce1 User in user detail will be removed.


Reference:


Friday, February 20, 2015

Add or remove Actions in Salesforce mobile app

Since version 7, Salesforce1 mobile app has replaced + icon to open Publisher Actions page with Action Bars and Action Menu. Before version 7, when user tap + icon, it will open the new page with multiple icons and paging.


In version 7, this is completely changed with Actions Bar.


Depending on which menu or record page user is viewing, the user will see different actions available in the action bar.

From Feed (or Chatter in the newer app version) and Today page, the user will see a set of actions (this may include Standard Chatter actions and Mobile Smart actions) defined in Global Publisher Layout, you can have multiple layouts and assigned to different profiles.

However, from a record page, the user will see a mix of actions and buttons added to object page layout:
  • Standard Chatter actions: such as Post, File, Link, Poll, Question, and Thanks.
  • Default actions: depend on the objects.
  • Mobile Smart actions: a set of preconfigured actions, just like default actions. They are available for account, case, contact, lead, opportunity, and custom object layout, including in Global Publisher layout.
  • Custom actions: actions that you create and customize, such as Create a Record, Update Record actions.
  • Productivity actions: depends on the objects. The actions include Call, Send Text, View Website, and Email.
  • Standard button: such as Change Owner, Change Record Type, Edit, Delete (action will be shown only if the user has the permission or the object fit the criteria, such as object with Record Type).
  • Custom button: buttons created with Display Type = Detail Page Button
If you have more than 5 icons, tap ... icon to open Action Menu which contains the full set of actions available for that page or record.


Global Actions
Appear in Feed (or Chatter in the newer app version) and Today page, by default Actions Bar will have icons of Post, File, New Event, New Task, and so on. How we can add/delete/re-order the icons?
  1. Navigate to SetupCreateGlobal ActionsPublisher Layouts
  2. You can have many layouts assign to different Profile. Select a Global Publisher Layout by click Edit link
  3. You will see available Actions available. You can add, remove, and re-order by drag and drop the icon in the Global Publisher


Create custom object record using Action
By default, Salesforce provides more than 10 default Global Actions, including create a record for standard objects such as New Account, New Case, and etc., also Email and Log a Case.

If you have custom objects, you will not see New action for those objects. You need to create Global Actions for each of them. Let us go through a sample:
  1. Navigate to SetupCreateGlobal Actions | Actions
  2. Click New Actions button
  3. Assume the object name is Service, enter Action Information as the screenshot below
  4. You will notice New Service now available in the available Actions
  5. Edit Global Publisher Layouts and drag New Service into Actions in the Publisher
create global action

add action to global publisher layout

new action added to global publisher layout and appear in Salesforce app


Object-Specific Actions
There are five types of object-specific actions:
  • Object-specific actions create records that are automatically associated with related records. For example, you add an object-specific action on the Account object that creates contacts. If a user creates a contact with that action on the detail page for the Acme account, that new contact is automatically associated with Acme.
  • Object-specific update actions make it easy for users to edit records. You define fields to be available when user update the record.
  • Object-specific Log a Call actions let users enter notes about calls, meetings, or other interactions that are related to a specific record.
  • Object-specific custom actions are Visualforce pages or canvas apps that let users interact with or create records that have a relationship to an object record.
  • Send email actions, available only in cases, give users access to a simplified version of the Case Feed Email action on Salesforce1
The default Object-Specific Actions available are depends on the object itself, check out this matrix.


You can configure object-specific actions from the object page layout, example for Account:
  1. Navigate to SetupCustomize | AccountsPage Layouts
  2. Look for Salesforce Mobile and Lightning Experience Actions, by default it will be inherited from the global publisher layout, but you can overwrite by click link override the predefined actions
  3. Mobile Smart Actions will be added by default, see reference below for more information. 

If the object has Lookup relationship with another object, example: Area custom object has a lookup relationship to Region custom object. You can create a Global Action to create Area record and add this global action to Global Publisher Layout. When the user executes the action from mobile or from Lightning Experience, Region will be blank, so the user needs to enter the Region manually.

For the same Area object, if we create new Area action from Region object, and add this object-specific action to Region layout, Region will be auto-populated in new Area layout.

Note: you can add Global Action to object page layout.


Now, let's see how this work for objects with Master-Detail relationship.
1. You can't create Global Action for a custom object which is a child in the Master-Detail relationship.
2. Only object specific action can be created for this kind of object, the action will be created from the parent object.


Let's see a sample on creating object specific action and adding the Action to the object layout, in this sample we will create Service (child) from Opportunity (parent).
  • Navigate to Setup | Customize | OpportunitiesButtons, Links, and Actions
  • Click New Action button and enter Action Information
  • You can define fields visible when the user clicks the Action.
  • Navigate to Opportunities Page Layout, find Action created and drag to Salesforce Mobile and Lightning Experience Actions


This is how it looks when the user selects Action menu:


Opportunity Name will be automatically populated:


Last update: 20-Mar-2018


Reference:


Sunday, January 4, 2015

Salesforce1 App from Mobile Browser

This blog is not about older Salesforce Classic mobile app, but the newer app Salesforce1.

For Salesforce users who do not install Salesforce1 mobile app into their smart phone, iOS or Android platform, users still able to get same Salesforce1 app experience using mobile web browser, as long as it is enabled in Salesforce1 Settings. But not all mobile web browser and devices are supported, here is the list of mobile web browser and the devices:
  • Apple Safari browser on iPad 2 and later models (including the iPad mini) and iPhone 4 and later models, with iOS 7 or later.
  • BlackBerry Browser on BlackBerry Z10 & Z30 devices with BlackBerry OS 10.2 or later, not support on BlackBerry Q10.
  • Google Chrome browser on Android phones and tablets, with Android 4.2 or later.
  • Microsoft Internet Explorer 11 browser on Lumia and HTC phones with Windows® 8.1.
For best results, Incognito Mode in Chrome, InPrivate Browsing in Internet Explorer, or Private Browsing in Safari or BlackBerry Browser should be turned off. A Wi-Fi or cellular network connection is required to communicate with Salesforce. If you’re using one of the Salesforce1 apps, you can view your most recently accessed records when your device is offline.

From mobile browser, open http://login.salesforce.com, enter your username and password. Once your login credential is accepted, your organization logo will be display as loading page, this is the same experience when opening Salesforce1 mobile app, then it will bring you to the same looks and feels with Salesforce1 app.


By default, the mobile browser app option is turned on for your organization wide, but admin able to configure it whether or not users can access the Salesforce1 mobile browser app when they log in to Salesforce from a mobile browser.

User able to see full / site by selecting Full Site option in Salesforce1 mobile browser menu, and back to Salesforce1 site by clicking Go to Salesforce1 link at the bottom of the page.

1. Salesforce1 Settings
Navigate to Setup | Mobile Administration | Salesforce1 | Settings, tick Enable the Salesforce1 mobile browser app. This allows all users to access Salesforce1 from supported mobile browsers. Deselect this option to turn off the mobile browser app, so users can access the full Salesforce site from a mobile browser instead.


When this option is turned on, users who log in to Salesforce from a supported mobile browser are always automatically directed to the Salesforce1 interface. If you want your users to access the full Salesforce site from mobile browsers instead, deselect this option.

2. Salesforce1 User
You will find this option in User Detail page. This option will only available when "Enable the Salesforce1 mobile browser app" is selected as in step 1 above - Salesforce1 Settings.

Salesforce1 mobile browser app disable

Salesforce1 mobile browser app enable

By selecting this option, user will automatically use the Salesforce1 mobile browser app when they log in to Salesforce from a supported mobile browser. If this option off, user will see normal / full Salesforce site. So, this option DO NOT related with enabling user to access Salesforce1 app using mobile device, see this blog to enable Salesforce1 access by profile/user.

When user login using web browser to access Salesforce1 app, the login history will still show the same browser, example: Safari 7 for iOS.

Reference:

Tuesday, September 23, 2014

How to enable Salesforce1 access by Profile / User?

By default, all users able to login to Salesforce.com able to login to Salesforce1 mobile app. But, can we control Salesforce1 app only for some users or by user profiles?  YES, here we go:

1. Setup Connected Apps
  • Setup - Manage Apps - Connected Apps, select both Salesforce1 for iOS and Salesforce1/Chatter for Android as user may use both devices.
  • Click Edit next to Salesforce1 for iOS
  • Change Permitted Users under OAuth policies from All Users may self-authorize to Admin-approved users are pre-authorized
  • To enhance security, you can enable PIN under Mobile Integration in this page
  • Save
  • Repeat the same for Salesforce1/Chatter for Android


2. Enable Profiles or Permission Sets
  • Once step 1 above done, click on Salesforce1 for iOS & Salesforce1/Chatter for Android link (not Edit link)
  • You will notice Profiles & Permission Sets related list added (this is because Permitted Users now is set to Admin-approved users are pre-authorized)
  • Click Manage Profiles or Manage Permission Sets button 
  • Select Profiles or Permission Sets to enable
  • Save
You can do the same from Profile page as well, look for Connected App Access section, then enable Salesforce1/Chatter for Android and .


The same for Permission Set:


When Permitted Users set to All Users may self-authorize, user will see below screen to self approve


Once it change to Admin-approved users are pre-authorized, for user not in the approved list, user will see error below:


You can monitor user login using Salesforce1 from Login History, see Application column.

Note: until Winter '15 release, even access to Salesforce1 is not success, because user is not in approve list, but login history Status for that login is still captured as Success.


Reference: Editing a Connected App


Page-level ad