Pages

Wednesday, October 26, 2022

Salesforce: Field Dependency across Record Type

This is to continue the previous blog Record Type on Creation, the scenario here: for the same user, the list of values for a picklist field configured as a dependent field should be different across record types.

Steps:

1. Set the field as a dependent field


2. Include ALL values of the dependent field in the controlling field, not only for a specific record type


3. Configure the field values available for each record type


4. Done


Now, you should see different available values for each record type for the same field.


Same user, same field, different record type, and different list of values.


Salesforce: Record Type on Creation

Background: a user does not see the Record Type prompt when creating a new record.

This is probably caused by:

1. The user profile is not enabled for certain record types of an object

To check this, go to the user profile, not to the object.

Looks for Record Type Settings


If you have Enhanced Profile User Interface enabled, look for Objects Settings, then Record Types and Page Layout Assignments


Additionally, you also can enable record type for certain users with permission set, see this blog.

Note: even if a user can't create a record with a specific record type, because it is not enabled, the user will be still able to access the record, as that is controlled by record visibility.

This scenario (no record type prompt) only happened when there is only 1 record type enabled for the user.

2. The user sets Default Record Type

Go to User Setting, and looks for Set Default Record Type under Display & Layout.

Note: this is not Advanced User Details and is not configurable by the admin, so the admin needs to log in as the user to check.


Reference:

Friday, October 21, 2022

Salesforce Lightning URL Hack

Scenario: Universal Inc would like to increase staff productivity with fewer clicks when creating a Case from the Account page, users still need to enter other fields, but a few fields have been populated by default:

  • Skip record type prompt
  • Type = Other

Solution: create a custom button and add it to the page layout. Here is the URL:

/lightning/o/Case/new?defaultFieldValues=RecordTypeId=0125g0000022dlQAAQ,AccountId={!Account.Id}&Type=Other


Reference:

Salesforce Inbox Included

More than a year ago, we wrote about Salesforce Inbox, and things have changed since the blog was written, mainly on the license, permissions set, and permissions. Here is the update:

In Summer '22 release, it was announced that Sales Cloud Unlimited and Performance Editions Now Include Inbox Without an Add-On License. If you are not using Unlimited and Performance Editions, you can still buy additional Inbox licenses separately (which also include the full Einstein Activity Capture license), check this

The new standard permission set is called Inbox Included, which contains Use Inbox permission, or as admin, you can create a custom permission set and select license = Inbox.


Or, you also can use the standard permission set Sales Cloud Included Bundle, which includes all permissions for Sales Cloud Unlimited. If you also purchased Sales Cloud Einstein and use the Sales Cloud Einstein permission set, Use Inbox permission is included in that permission set, so no need to assign many duplicates and unnecessary permission sets, always look for simplicity and clarity.

So again, what is Inbox? It is a productivity tool to work with Salesforce from your email client.

  • Contextual CRM — see relevant CRM records in your email client.
    • Easily create Lead/Contact if the sender or recipients are not in Salesforce.
  • Create — allow users to create new records based on Global Actions configured in Lightning.
  • Search — stay in Outlook/Gmail to search and access Salesforce records.
    • Include: view detail and related tab, edit records, log email, open in Salesforce, and perform Chatter actions.
  • Managed Task — create and manage Salesforce’s Tasks from Outlook.
  • Log Emails — including incoming and outgoing emails.
  • Insert Availability — let your recipient select a time slot for a meeting based on your calendar.
  • Email Templates & Text Shortcuts — reuse and standardize email templates for teams and personalize text shortcuts.
  • Track Outgoing Emails and Links — get insight when the recipient read and clicks links in the email sent.
  • Send Later — ensure that people receive your email when they are most likely to act upon it, this is also available when sending email from Salesforce.com
  • Mobile apps — manage customer communications to include Salesforce CRM records from mobile.

Reference:


Monday, October 17, 2022

Salesforce Pipeline Inspection

Pipeline Inspection probably is an upgrade of the list view, but just for the Opportunity object. Before we discuss further Pipeline Inspection, let's see what is required to access Pipeline Inspection.

To access Pipeline Inspection, you need to have Pipeline Inspection User permission, which is available under the Pipeline Inspection Included permission set. You will have this Pipeline Inspection license if you use Unlimited or Performance edition. In short, you must be on Unlimited or Performance edition, then assign a permission set that has Pipeline Inspection User permission enabled.

"Pipeline Inspection gives sales teams a consolidated view of pipeline metrics, opportunities, week-to-week changes, AI-driven insights, close date predictions, and activity information. With this intelligence, sales teams can focus on the most important opportunities and forecast revenue more accurately." quote from salesforce article. Those features are great for reps and their manager to manage their pipeline.


Period
Starting from the top, you can select opportunity closing: This Week, This Month, This  Quarter, Next Week, Next Month, Next Quarter, or Custom.

For
Then, you can select opportunities owned by: Me, My Team (people under me in the role hierarchy), My Opportunity Teams (opportunities where I am added to the Opportunity team), and every user below me under the role hierarchy, users available here:

  • Active users
  • Not assigned with Chatter profiles
  • Include Partner Community users, for internal users', the name end with 's Teams, such as John Smith's Teams, while partner community users only have the full name. There is no way to hide partner community users from the dropdown, so vote for this idea. When selecting an internal user, because it is "Teams", this will include all opportunities owned by users below the role hierarchy.

Important Opportunities
Next is the "Important Opportunities", click this icon to filter opportunities that you have manually marked as important. This marking is for each user and can't be shared with other users. You can mark up to 200 opportunities as important. Those opportunities marked as important will be shown in the "My Important Opportunities" view too.


Pipeline Inspection Metrics
There are 8 metrics below the selection:

  1. Total
  2. Closed Won
  3. Commit (with forecast categories of Closed Won or Commit)
  4. Best Case (with forecast categories of Closed Won, Commit, Best Case)
  5. Open Pipeline (with forecast categories of Commit, Best Case, Pipeline).
  6. Closed Lost
  7. Moved In (total opportunities moved into the selected period, including opportunities with closed date moved into the selected period and new opportunities created)
  8. Moved Out (total opportunities moved out of the selected period, including opportunities with closed date in the selected period when it started and new opportunities created during the period)

Unfortunately, you cannot customize the metrics, such as using the Stage Name (without changing Forecast Category), renaming, or hiding any of the metrics, so vote for this idea

Clicking the metric will filter the opportunities shown in the table below the metrics.

When clicking the Opportunity tab, all users will always land in Total metrics for This Month for Me, it will be great if the system remembers my last filters and metrics selected.

Setup
1. Enable Pipeline Inspection from the setup menu, this will auto-enable historical trending for opportunities.
2. Enable the Pipeline Inspection button in the Opportunity object, look from "List View Button Layout".
3. Assign permission set to users, it can be the standard permission set "Pipeline Inspection User", or custom permission set with the Pipeline Inspection license.

View
Once setup is completed, to access Pipeline Inspection, users must click the "Pipeline Inspection" button from the Opportunity tab, so this is not to replace the list view. Admin is unable to set the user by default landed at Pipeline Inspection when clicking the Opportunity tab. But, the system will remember if you are in Pipeline Inspection or list view, the next time you click the Opportunity tab, you will be landed based on your last usage. 

As mentioned in the important opportunities above, there will be 2 views available by default, "My Pipeline" (default) and "My Important Opportunities". You can create a new view for yourself or for your users, but you cannot modify the default "My Pipeline" view for your users, so vote for my idea here.

There are 10 fields added by default:

  1. Opportunity Name (with Deal Insight overview)
  2. Mark Important
  3. Account Name
  4. Amount (with the increase or decrease indicator)
  5. Close Date (with indicator initial push date and Einstein prediction)
  6. Stage
  7. Recent Activity (how many days ago)
  8. Forecast Category
  9. Next Step (with an indicator if not updated and when the last update)
  10. Owner Full Name
There are 3 useful fields that can be added:
1. Push Count
2. Opportunity Score
3. Top Insight (if you have Einstein Opportunity Insights enabled)

Sample Pipeline Inspection

Deal Insight Overview next to the Opportunity name:

Insight for Close Date

Stage changed information

Information for the Next Step


Idea Exchange
Because Pipeline Inspection is pretty new and only available for Unlimited, Performance, and users that purchase the Revenue Intelligence license, there are not many ideas created and voted on by the community, here are a few worth to vote:


Friday, October 14, 2022

Salesforce Scoping Rules

Quote from a Salesforce 
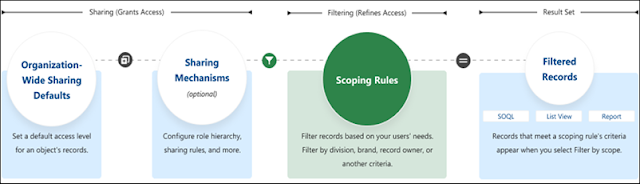
article "Scoping rules let you control the records that your users see based on criteria that you select. You can set up scoping rules for different users in your Salesforce org so that they can focus on the records that matter to them. Users can switch the set of records they’re seeing as needed."

As above, scoping rule is not similar to the restriction rule, where the restriction rule prevents the user to access certain records, while scoping rule is just to scope for the user to focus on a set of records, so users can still access all other records that they can access according to the sharing rules settings.


As of now (Winter '23 release), scoping rules are available for custom objects, Account, Case, Contact, Lead, Opportunity, Event, and Task. It is available in Unlimited or Performance edition, if you use Unlimited or Performance edition but do not see scoping rules available in the objects mentioned above, reach out to Salesforce support to enable it.

When a scoping rule is applied to a user, the data that the user sees in list views and reports are filtered by the criteria you set.

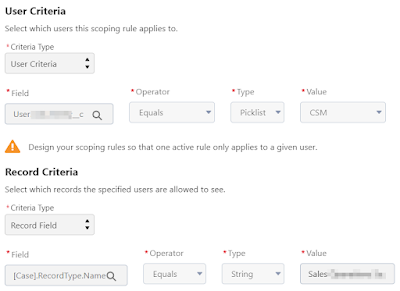
Follow this article to create scoping rules, there are 2 options for User Criteria when creating a scoping rule:

  1. Criteria Type = User Criteria
  2. Criteria Type = Permission Criteria


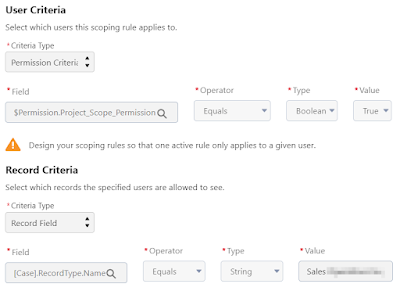
User Criteria, select a field in the user object as the criteria of who the rule will apply, unfortunately, you can't use the field of the child object such as Profile Name or Role Name at this moment, so just using their Id will work, and there is no option to set multiple criteria and use AND logic.

On the Record Criteria, set criteria to filter records that fit into the scoping. Here you can use the field from a child object, but no option to set multiple criteria and use AND logic.


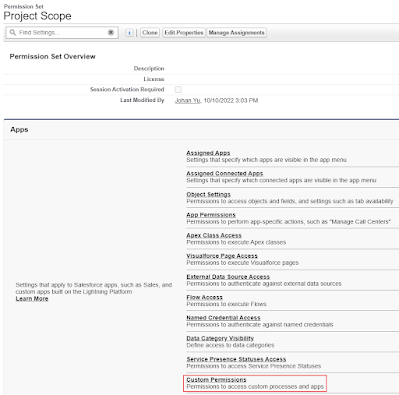
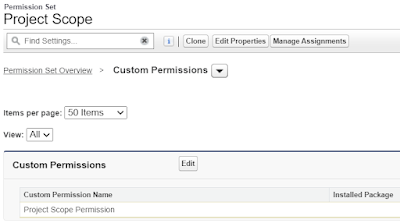
Permission Criteria, this uses custom permission, then defines the custom permission under the permission set, then assigns users to that permission set. 


Once the custom permission and the permission set are created, you can use the custom permission in scoping rule.


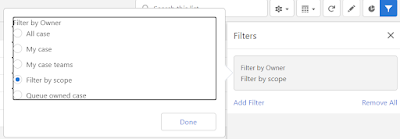
Make sure the scoping rule is active and let us see how it works in the list view and report. In the list view Filter by Owner, select Filter by scope.


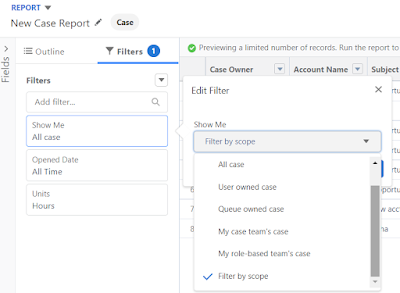
The same for the report filter, select Filter by scope.


The result of the above list view and report is based on the record criteria defined in the scoping rule. As you see that "Filter by Scope" is just an option, meaning your users can select other filters option too.

Known Issue: if the User Criteria contain space, this will not be saved by the scoping rule, and this cause the scoping rule will not to run for the users defined, check out this.


Reference:


Thursday, October 13, 2022

Salesforce Case Closed Date

Case object in Salesforce is a bit different and special compare to other objects. There are additional fields such as Date/Time Opened and Date/Time Closed. 

The Date/Time Opened field value is the same as the Created Date field in other objects, this field can be added to the case page layout.

The Date/Time Closed field is auto-populated when the case status is changed to system Closed, this field can be added to the case page layout too, but the field is not available for history tracking.


Report

In the report, there are additional fields available as screenshot below:


Each pair have the date time field and date only field:

1. Date/Time Opened with Opened Date

2. Date/Time Closed with Closed Date

3. Case Date/Time Last Modified with Case Last Modified Date

But, the Created Date field will not available for reporting in Case.


Date/Time Closed field

As mentioned above, when the case status is changed to system closed, the date/time closed field will be auto-populated as when the case is closed.

However, when the case is re-open, the value of the date/time closed field will be set to blank and populate back with when the latest case is closed.


SOQL

Sample SELECT Id, CreatedDate,ClosedDate FROM case WHERE Id = '5000o00002J2JQzAAN'


The format for both fields here is date/time.


Salesforce Einstein Insight


Einstein Account Insight and Opportunity Insight are part of Sales Cloud Einstein. Recently, a few items from Sales Cloud Einstein are added as part of the Unlimited or Performance edition, which includes:

  • Salesforce Inbox
  • Sales Engagement (formerly High Velocity Sales)
  • Sales Cloud Einstein Included, which is: Einstein Opportunity Score, Einstein Lead Score, Einstein Forecasting, and Einstein Automated Contacts.

However, Einstein Insight is not included in the Unlimited or Performance edition. So, you still need to get the additional Sales Cloud Einstein licenses, even if you are in the Unlimited or Performance edition.

So, what is inside Sales Cloud Unlimited and Sales Cloud Einstein permission set?

Sales Cloud Unlimited permission set license
Notice that both Einstein Insights are not in the above permission set license.


Sales Cloud Einstein permission set license

Once you have the license acquired, a few steps need to be performed:

  1. Enable Einstein Account Insights
  2. Enable Einstein Opportunity Insights
  3. Assign users with the "Sales Cloud Einstein" permission set

Once the setup is completed, the system will take up to 24 hours before the initial batch of insights is available, so not all accounts and opportunities will have insights. You will see the insights as a component in the Home, Account, and Opportunity record pages.

How to see records that have Insights?

For opportunity, create a list view and add the "Top Insight" column, additionally, you also can see it from the "Einstein Opportunity Insights" tab, make sure to enable the "Einstein Opportunity Insights" tab for the profile.

For account, unfortunately, we don't have this in the list view (as per Winter 23 release), so only from the "Einstein Account Insights" tab, make sure to enable the "Einstein Account Insights" tab for the profile.

Unfortunately, you cannot run a report to export the insights, so vote for this idea. However, you can query AccountInsight and OpportunityInsight objects, sample:

SELECT Id, AccountId, Title, TrendType, Type from AccountInsight 


SELECT Id, OpportunityId, Rationale, Title, TrendType, Type from OpportunityInsight 


Reference:

Page-level ad