Pages

Thursday, December 7, 2023

Understanding complex Salesforce customization

Every Salesforce org is different, and as a Salesforce admin or developer, you may inherit the customization built by a team or consulting company that is no longer engaged, and worse, there is no good documentation available.

Panaya has released an AI-powered solution, helping Salesforce professionals understand complex customization by translating them into simple language.

The tool can also copy the explanation and use it to create documentation. The solution supports the following component types: Apex Code, Validation Rules, Formulas, and Flows.

Check out this link for more info.


Thursday, November 30, 2023

CRM Analytics: URL tips

In scenarios when we can't open a dashboard or dataset via "click", here are some shortcuts.

Open Dashboard JSON Editor

Add "/json" at the end of the Dashboard Id, e.g., https://domain.lightning.force.com/analytics/dashboard/0FK34000000KzniGAC/json


Explore Dataset 

https://domain.lightning.force.com/analytics/lens/new1/dataset/0FbHr000000dSdAKAU
If you are wondering what "new1" is, you can change it to new2 or new3, etc.


Edit Dataset

https://domain.lightning.force.com/analytics/dataset/0FbHr000000dSdAKAU
or 
https://domain.lightning.force.com/0FbHr000000dSdAKAU  This will be translated as https://domain.lightning.force.com/lightning/r/EdgeMart/0FbHr000000dSdAKAU/view


Reference

Tuesday, November 28, 2023

Salesforce: Reason for Access in Sharing

In an old blog written many years back, you can check the reason for access of a record to a user using the Sharing button. There is a slight difference in information given in Classic compared to Lightning.

Classic:
https://domain.my.salesforce.com/setup/own/entitywhylist.jsp?id=0060o00001TvlTM&uid=00590000000Ougm


Lightning:
https://domain.lightning.force.com/lightning/r/Opportunity/0060o00001TvlTMAAZ/recordShareHierarchy?userId=00590000000OugmAAC


Classic does not tell you which sharing rule, but only "Shared With". Lightning does better with the Rule Name, but in the above sample, the rule name is not very helpful "This_is_Test".


The Sharing Rule

Let's look at the sharing rule; for the below example, since there's only one sharing rule with "Shared With" to a specific group, we can identify the sharing rule quickly, but if there are many, we need to click edit to each rule to see the rule name. 


The rule name will only be visible when clicking the "Edit" link.


Is there an easy way to find the rule? 
Yes, you can download the metadata, e.g., using Salesforce Inspector or Workbench. 

    <sharingCriteriaRules>
        <fullName>This_is_Test</fullName>
        <accessLevel>Read</accessLevel>
        <label>This is Test</label>
        <sharedTo>
            <group>Group_Staff_2B</group>
        </sharedTo>
        <criteriaItems>
            <field>FieldName</field>
            <operation>notEqual</operation>
            <value>CH1,SG1</value>
        </criteriaItems>
        <includeRecordsOwnedByAll>true</includeRecordsOwnedByAll>
    </sharingCriteriaRules>


Sharing Rule by Criteria

Text and Text Area are case-sensitive. For example, a criteria-based sharing rule that specifies “Manager” in a text field doesn’t share records that have “manager” in the field. To create a rule with several common cases of a word, enter each value separated by a comma.

Example from below screenshot: Account Name containing AAA will be shared with Group Staff 1, but not for Account Name containing aaa


You can use the following field type for sharing by criteria:
  • Text
  • Text Area
  • Picklist
  • Checkbox
  • Number
  • Percent
  • Fax
  • Phone
  • URL
  • Date
  • Date/Time
  • Email

But, not the following field type:
  • Lookup
  • Formula
  • Currency
  • Long Text Area
  • Rich Text Area
  • Picklist (Multi-Select)
  • Roll-Up Summary


Reference:


Saturday, November 25, 2023

Image Upload on Salesforce: The Capabilities and Limitations

Are you already using images on Salesforce? If not, you should be, as making your Salesforce more visual has benefits that exceed simple time saving and productivity increases. Image usage can empower your end users to do their jobs in the most effective way possible.

Here's how you can upload images natively in Salesforce:

1. Uploading files through standard buttons (and in Flows)

The standard “Upload File” button under the “Notes and Attachments” section can be used to upload images to Salesforce.

Additionally, the same function exists as a lightning component so that file (and image) upload can be used as a part of flows or self-developed screens. Through this method, you can add an Upload button to any of your flow screens.


2. Working with Images in Rich Text Fields

It is possible to upload pictures to the rich text field in Salesforce, the process is very easy, and the image is stored as a content document that will appear as a visual in the rich text field.


3. Take pictures and upload from your mobile device

The upload file and add images in rich text are also available on mobile. Doing so, lets you allow your users to open their device camera or device camera roll on either iOS or Android from their Salesforce mobile application. They can then snap photos and upload them directly to Salesforce. But also pick any pictures already taken from the camera roll to upload.

A component named Upload image and annotate is a good demonstration of what a developer can do in Field Service using the latest API available. As of now, this is only limited to being used from the menu item and is not applicable to flow. And only to be used by developers as it is only available as a source code as of now.


What are the limitations with uploading images in Salesforce?

While the Salesforce stock methods for uploading images may be suitable for you depending on your use case, there are limits for those who need to make frequent or heavy image photo uploads. Here are the principal limits for image upload in base Salesforce:

1. Rich text field upload limit

When you upload an image through the rich text field, it’s saved in the rich text data as a file, this file storage is limited to 1 megabit per image. This is a huge limitation for the type of image you can have based on file size and quality. That limit is especially hindering for users who use pictures taken from a mobile device, which naturally exceeds this limit.

 To put this in perspective, the average size of a photo captured with a newer iPhone is around 3 MB. If your end users are trying to upload files of this size, they will hit a roadblock that looks like this within Salesforce:

If you need to upload large images of any size or format and need them inserted in the rich text field, SharinPix has the solution for storing and presenting the image in the rich text field. 


2. Android upload limit

Many people in the USA are using Apple products for both their computer and cellphone needs, and those people as Salesforce users won’t have any problems uploading multiple images to Salesforce from their IOS devices. But it’s not always a guarantee that the users operating in your org will have an iPhone or an iPad at their disposal. 

For Android device users, even simply uploading photos is an incredibly time-consuming task. The current version of APIs used by the Salesforce Mobile App blocks Android devices from uploading multiple images from the camera roll at one time. This problem could be solved in the future through updates, but for now, it’s still a roadblock for Android users.

Take a look at these side-by-side screenshot examples of the experience on IOS versus Android for uploading multiple images to Salesforce:


3. Metadata is not available

With the standard upload methods in Salesforce (add file button, file upload component, rich text field, or otherwise), you don’t have access to some crucial information in the metadata by default. These data can be extracted or included with image upload using dev tricks with an external API, but it’s extra manual work.

These limitations exist because of concerns about technological privacy, where users don’t want data (location, date, time, etc.) associated with an image. So, operating systems and security services automatically clean this data out before upload.

Even if the data was uploaded along with the image, it wouldn’t be automatically exposed as a field in Salesforce, making it difficult to use efficiently. With the growing strength of AI capabilities today, it’s more important than ever to use metadata such as time and location to verify that an image is genuine and that you can trust the users who provided it.


4. Salesforce storage limitations

Storage costs on Salesforce could pose a huge problem for users who are uploading large amounts of images, regardless of origin. There is technically no limit to how much file storage you can have, but having to constantly increase that amount takes time and communication with Salesforce and can be impossible to accurately predict.


How to make Image usage on Salesforce easy? 

Using photos in Salesforce should be easy, but it’s a complicated headache that will cost you a lot of time and money. SharinPix exists to make it easy! We can help you unlock pro photo usage on Salesforce. SharinPix has everything you need to edit, resize, annotate, and watermark without leaving Salesforce.  


SharinPix will help you operate beyond the limits mentioned in this article as well as the other limits that exist within Salesforce. SharinPix will facilitate image upload on all fronts, allowing bulk uploads through drag and drop with features exposing metadata as usable information in Salesforce.

You can visit the SharinPix AppExchange listing to learn more about the solution or chat with one of our Visual Experts, who will be able to show you exactly how to get the smoothest visual experience in Salesforce. 


Author:
Jean-Michel Mougeolle
CEO of SharinPix
Salesforce MVP


Thursday, October 26, 2023

Salesforce: Case Age

In the Salesforce report, we can quickly add the 'Age' field to the report; it is even more flexible, where we can select the "unit" in Minutes, Hours, and Days. But before we discuss this further, let us agree on what is Case Age? 

  • For open cases, the elapsed time from creation to the present
  • For closed cases, the elapsed time from creation to the closing time of the case

Because 'Age' in the report is not an actual field, we cannot show it in the page layout or list view, to get this, we can create a custom Age field with the following formulas:

  • Case Age in Days - IF(IsClosed, ClosedDate - CreatedDate, NOW() - CreatedDate)
  • Case Age in Hours - IF(IsClosed, (ClosedDate - CreatedDate) * 24, (NOW() - CreatedDate) * 24)
  • Case Age in Minutes - IF(IsClosed, (ClosedDate - CreatedDate) * 1440, (NOW() - CreatedDate) * 1440)

But what if we want to exclude the weekends? Here is the formula to calculate case age without weekends in Days:

IF (IsClosed,
IF ((CASE(MOD( Datevalue(CreatedDate) - DATE(1900,1,1),7),
0, CASE( MOD( Datevalue(ClosedDate) - Datevalue(CreatedDate) ,7),1,2,2,3,3,4,4,5,5,5,6,5,1),
1, CASE( MOD( Datevalue(ClosedDate) - Datevalue(CreatedDate) ,7),1,2,2,3,3,4,4,4,5,4,6,5,1),
2, CASE( MOD( Datevalue(ClosedDate) - Datevalue(CreatedDate) ,7),1,2,2,3,3,3,4,3,5,4,6,5,1),
3, CASE( MOD( Datevalue(ClosedDate) - Datevalue(CreatedDate) ,7),1,2,2,2,3,2,4,3,5,4,6,5,1),
4, CASE( MOD( Datevalue(ClosedDate) - Datevalue(CreatedDate) ,7),1,1,2,1,3,2,4,3,5,4,6,5,1),
5, CASE( MOD( Datevalue(ClosedDate) - Datevalue(CreatedDate) ,7),1,0,2,1,3,2,4,3,5,4,6,5,0),
6, CASE( MOD( Datevalue(ClosedDate) - Datevalue(CreatedDate) ,7),1,1,2,2,3,3,4,4,5,5,6,5,0),
999)
+ (FLOOR(( Datevalue(ClosedDate) - Datevalue(CreatedDate))/7)*5)
- 1) < 0,
0,
CASE(MOD( Datevalue(CreatedDate) - DATE(1900,1,1),7),
0, CASE( MOD( Datevalue(ClosedDate) - Datevalue(CreatedDate) ,7),1,2,2,3,3,4,4,5,5,5,6,5,1),
1, CASE( MOD( Datevalue(ClosedDate) - Datevalue(CreatedDate) ,7),1,2,2,3,3,4,4,4,5,4,6,5,1),
2, CASE( MOD( Datevalue(ClosedDate) - Datevalue(CreatedDate) ,7),1,2,2,3,3,3,4,3,5,4,6,5,1),
3, CASE( MOD( Datevalue(ClosedDate) - Datevalue(CreatedDate) ,7),1,2,2,2,3,2,4,3,5,4,6,5,1),
4, CASE( MOD( Datevalue(ClosedDate) - Datevalue(CreatedDate) ,7),1,1,2,1,3,2,4,3,5,4,6,5,1),
5, CASE( MOD( Datevalue(ClosedDate) - Datevalue(CreatedDate) ,7),1,0,2,1,3,2,4,3,5,4,6,5,0),
6, CASE( MOD( Datevalue(ClosedDate) - Datevalue(CreatedDate) ,7),1,1,2,2,3,3,4,4,5,5,6,5,0),
999)
+ (FLOOR(( Datevalue(ClosedDate) - Datevalue(CreatedDate))/7)*5)
- 1),
IF ((CASE(MOD( Datevalue(CreatedDate) - DATE(1900,1,1),7),
0, CASE( MOD( Today() - Datevalue(CreatedDate) ,7),1,2,2,3,3,4,4,5,5,5,6,5,1),
1, CASE( MOD( Today() - Datevalue(CreatedDate) ,7),1,2,2,3,3,4,4,4,5,4,6,5,1),
2, CASE( MOD( Today() - Datevalue(CreatedDate) ,7),1,2,2,3,3,3,4,3,5,4,6,5,1),
3, CASE( MOD( Today() - Datevalue(CreatedDate) ,7),1,2,2,2,3,2,4,3,5,4,6,5,1),
4, CASE( MOD( Today() - Datevalue(CreatedDate) ,7),1,1,2,1,3,2,4,3,5,4,6,5,1),
5, CASE( MOD( Today() - Datevalue(CreatedDate) ,7),1,0,2,1,3,2,4,3,5,4,6,5,0),
6, CASE( MOD( Today() - Datevalue(CreatedDate) ,7),1,1,2,2,3,3,4,4,5,5,6,5,0),
999)
+ (FLOOR(( Today() - Datevalue(CreatedDate))/7)*5)
- 1) < 0,
0,
CASE(MOD( Datevalue(CreatedDate) - DATE(1900,1,1),7),
0, CASE( MOD( Today() - Datevalue(CreatedDate) ,7),1,2,2,3,3,4,4,5,5,5,6,5,1),
1, CASE( MOD( Today() - Datevalue(CreatedDate) ,7),1,2,2,3,3,4,4,4,5,4,6,5,1),
2, CASE( MOD( Today() - Datevalue(CreatedDate) ,7),1,2,2,3,3,3,4,3,5,4,6,5,1),
3, CASE( MOD( Today() - Datevalue(CreatedDate) ,7),1,2,2,2,3,2,4,3,5,4,6,5,1),
4, CASE( MOD( Today() - Datevalue(CreatedDate) ,7),1,1,2,1,3,2,4,3,5,4,6,5,1),
5, CASE( MOD( Today() - Datevalue(CreatedDate) ,7),1,0,2,1,3,2,4,3,5,4,6,5,0),
6, CASE( MOD( Today() - Datevalue(CreatedDate) ,7),1,1,2,2,3,3,4,4,5,5,6,5,0),
999)
+ (FLOOR(( Today() - Datevalue(CreatedDate))/7)*5)
- 1)
)

Some example: 


Questions:
  • Will the calculation include decimal points for time differences? No, unless someone has an updated formula to include the time
  • Will the calculation honor the user's timezone? Yes, the date is based on your user timezone in Salesforce. For example, user A with Pacific time will see a date time field as "10/01/2021 18:27"; however, user B in Singapore time will see the same data as "1/11/2021 10:27 AM". The formula field calculation will only based on date; therefore, the result of aging between A and B will be one day different. For example, the below case is an open case, and today's date is 3rd Nov 2023.

User A


User B


Note: since this formula field is using the DATEVALUE() formula, if your users are also located in the daylight savings timezone, you need to enable "Improve DATEVALUE() accuracy for DST" under "Company Information" in the setup menu (check out this article); otherwise the calculation for users (with daylight saving timezone) related to processing times between 11:00 PM and 1:00 AM may wrong.


Another sample: 

The report was run on 1-Dec-2023 at 3:23 PM, SGT.

The same report is opened by different users with Pacific time with "Improve DATEVALUE() accuracy for DST" enabled. The current time for this user was 30-Nov-2023 at 11:23 PM PST.

Case 12311766, 12311380, and 12311379 were created on the same day as the current day, 30-Nov-2023, for users in the Pacific time, so those cases' ages (excluding weekends) are 0 days.

Time difference

The above case age calculation will ignore the time of case creation and time of case closed. The following formula will return the time in hours (while ignoring the date) -- result in the number field with 2 decimal points.

(TIMENOW() - TIMEVALUE(CreatedDate))/3600000


The above report is run on 30-Nov-2023 at 4:34 PM:
  • the row 4th from bottom: this is counted between 4:46 PM with 4:34 PM = 23.81
  • the row 3rd from bottom: this is counted between 3:56 PM with 4:34 PM = 0.64
So, this is clear that the dates are simply ignored.


Reference:


Monday, October 23, 2023

CRM Analytics: Salesforce Output Connection

For those who use CRM Analytics, we know that we can use dataflow/recipe to prepare datasets, which means transforming data for use in dashboards. Additionally, using a recipe, you can use the data prepared (with transformed data) to store in Salesforce or another Salesforce org. Imagine that CRM Analytic experts now become a specialist without the need to write scripts for Apex Scheduler.

Push your prepared dataset data into any Salesforce org from CRM Analytics Salesforce Output connector and Data Prep. With your prepared data back in Salesforce, you can integrate external data, apply the suite of Salesforce automation tools to act on the data, and allow non-CRM Analytics users access to the data through reports and dashboards.

Here are the steps:

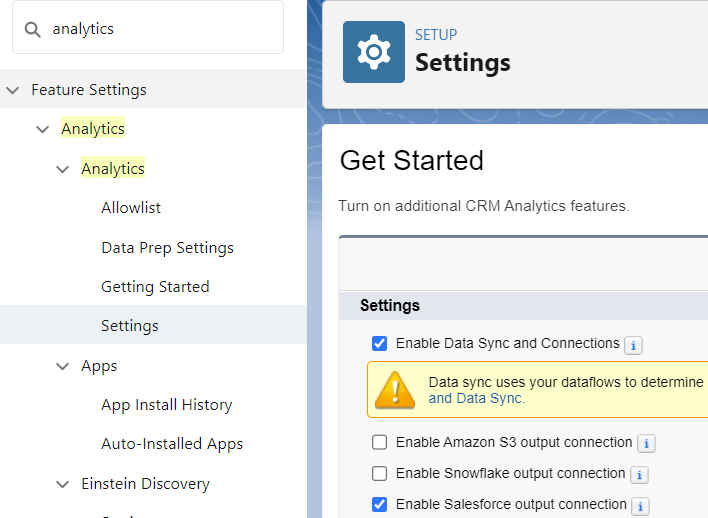
1. Enable "Enable Salesforce output connection" in the Analytics Setting in the Salesforce setup menu.


2. From Analytics Studio >> Data Manager, create an Output Connection; remember to add the security token after the password and change the Service URL if you plan to test in a sandbox


3. In the recipe Output node, select "Write To" with "Output Connection"; the operation could be Insert, Update, or Upsert. For the update operation, select a field from the destination object for the External ID to act as the unique record identifier, such as an Id from the source object, but it can't be a look field. The system will match using this field to determine if the operation to insert to update.


Scenario: sync a custom object from Account with a lookup field from the custom object to Account. 

As mentioned above, you can't use a lookup field as an External Id, so we need to create a text field to store the Account Id in the target object for matching. 

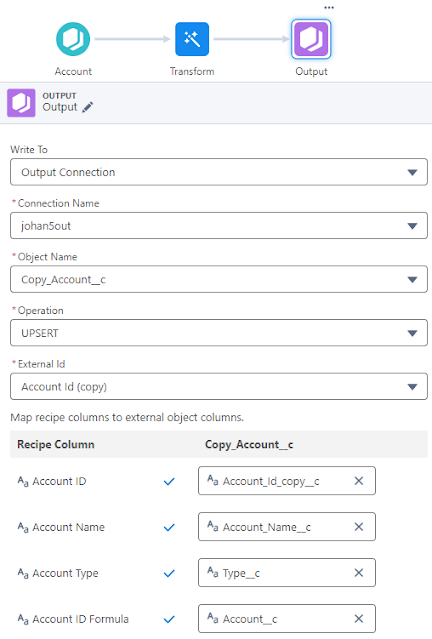
All columns from the source must be mapped one-to-one to the output object, which also means we can't map the field from the source node twice, so we need to clone the source field in a transform node.

Here is the detail of the Output node in a simple recipe:


External Id is set to the "Account Id (copy)" field, which is a text field in the target object to hold the Id of the Account record.

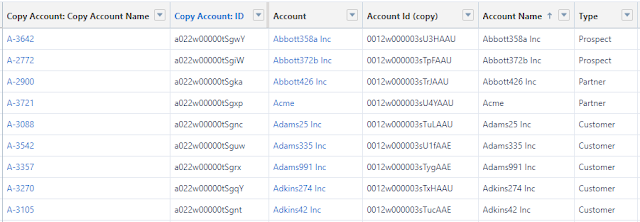
These are the fields of the target object :


Result after recipe run:


Reference:


Tuesday, October 17, 2023

Salesforce: Related components

There are many components available in Lightning Page Builder related to the child object, parent, or child of the parent. Let us discuss each component here:


Related List

This component will show all "related lists" (child objects) that are added to the Classic page layout assigned. There is nothing new here; all setup is done in the Classic page layout. It will show all data from the child objects, but we cannot filter the related list based on something, such as "Open Opportunities".

The benefit of adding the child objects to the related list is, if you have the Related List Quick Links component, the child records will be automatically shown there.


Related List - Single

The idea of using this component is to show records from a child object that links to the record, instead of all child objects that are added to the related list. 

Additionally, instead of showing details of the child record, we can configure the component to show the child of the parent record. 

Example: On the Contact page, we can configure the component to show Contact Roles (which is a child object of the Contact). Or, we can also configure the component to show Assets (which is a child object of the Account).


One thing to make sure here is, the object must be added to the related list of the "parent record"object (as in the above screenshot).

Here is the option of "Parent Record" for Contact, select "Use This xxxx object" to show the child the current object; if the current object has other parents, it will show the field name here.

For the "Related List Type", the list (Basic List and Enhanced List) will only work when the component is used in the broader panel; otherwise, it will shown as a Tile.


Dynamic Related List - Single

We discussed Dynamic Related List in the previous blog; in short, this component is enhanced from Related List - Single:
  • It does not depend on the related list
  • Ability to filter only specific data, such as Open Opportunities, Open Cases, etc.
  • Show/hide action bar
  • Configure the fields, sort field and order
But because this does not depend on page layout, the object added here will not shown in the Related List Quick Links component.

However, there is a limitation of Dynamic Related List - Single, it does not support all child objects as in the "Related List - Single" component, see the difference here:

Related List - Single

Dynamic Related List - Single

As you see from the above screenshots, for the Case object, Dynamic Related List - Single does not have Email, Files, etc.


Related Record

This component allows the admin to show a set of fields from the object itself or from the parent record.


You need to create "action" for the object and set it as Update Action. When creating the action, you can select the fields to be added, set as mandatory or as read-only.


Thursday, September 28, 2023

CRM Analytics: Build Cumulative Percentage Chart

Use case: show the percentage of runners who finish the 5 km run in less than 35 minutes, less than 40 minutes, less than 45 minutes, and 45 minutes or above.

Here are the steps

1. Create a Compare Table

2. Clone "Count of Rows" column

3. Edit cloned "Count of Rows"


4. Select "Running Total" from f(x), you can add a header too


5. Switch to Query mode to calculate the percentage

Here is the original query

  1. q = load "run_result";
  2. q = group q by 'Bucket';
  3. q = foreach q generate q.'Bucket' as 'Bucket', count(q) as 'A';
  4. q = group q by 'Bucket';
  5. q = foreach q generate 'Bucket', first(A) as 'A', sum(sum(A)) over ([..0] partition by all order by ('Bucket')) as 'B';
  6. q = order q by 'Bucket' asc;
  7. q = limit q 2000;

Update row #5 to
q = foreach q generate 'Bucket', first(A) as 'A', sum(sum(A)) over ([..0] partition by all order by 'Bucket') as 'B', sum(sum(A)) over ([..0] partition by all order by 'Bucket')/sum(sum(A)) over([..] partition by 'all') as 'cumulative (%)';

6. Format "cumulative (%)" to Percent or Custom


7. Switch the chart mode and select line chart

8. Hide A and B from Y-Axis and done


With this chart, we can easily understand the percentage of runners who complete the run in less than 35 minutes, less than 40 minutes, less than 45 minutes, and 45 minutes or above.


Tuesday, September 26, 2023

Bucket field in CRM Analytic

There are a few options to bucket field in CRM Analytics; let us see each option:

Scenario: field name = Option, bucket value A, B, C as "Executive", D, E, F as "Premier", all others as "Standard".


1. SAQL in the dashboard

Edit the widget and hit query mode

q = load "SalesData1";
q = filter q by 'Country' == "Singapore";
q = filter q by 'Option' is not null;
q = foreach q generate (case when Option in ["A","B","C"] then "Executive" when Option in ["D","E","F"] then "Premier" else "Standard" end) as 'Bucket';
q1 = group q by 'Bucket';
q1 = foreach q1 generate 'Bucket', count(q1) as 'Count';

This will work; however, there will be issues:

  • Unable to broadcast selection as facet from the chart with SAQL because the identifier is unknown. When selecting the grouping, other widgets will get an error "Can't display this widget. This widget can't be displayed because there is a problem with its source query: Undefined identifier: "SAQL Field As". Make sure the "SAQL Field As" identifier exists and is spelled correctly without spaces.". However, the widget will still be able to receive filters from other widgets. You can deactivate "Broadcast selections as facets" for that query, but it is not ideal.
  • Performance factors, system recommended: No Groupings After Projections and No Case Statements in Projections


Another sample:

q = load "SalesData1";
q = filter q by 'Country' == "Singapore";
q = filter q by 'Option' is not null;
q = group q by ('StartTime', 'Owner.Region__c');
q = foreach q generate q.'StartTime' as 'StartTime', (case when 'Owner.Region__c' is null then "Unknown" else 'Owner.Region__c' end) as 'Region', count(q) as 'Count';
q = order q by ('StartTime' asc, 'Region' asc);
q = limit q 2000;


2. Edit field value

Issue:

  • Loss of the original field value
  • The fields will not be grouped, even if they have the same value

From the screenshot above, the three Executive originally were A, B, and C; they are not combined by the system.


3. Using Recipe or Dataflow to create new fields

This is the most ideal option, but you have to edit the recipe or data.


Sunday, September 24, 2023

System 'Name' fields length and maximum length

Common and useful system 'Name' fields length and maximum characters length:

  • Account Name = 255
  • Opportunity Name = 120
  • Contact First Name = 40
  • Contact Last Name = 80
  • Lead First Name = 40
  • Lead Last Name = 80
  • User First Name = 40
  • User Last Name = 80
  • Profile Name = 255
  • Permission Set Name = 80 
  • Campaign Name = 80
  • Task Subject = 255
  • Event Subject = 255
  • Case Subject = 255
  • User Role Name = 80
  • File Title = 255
  • Report Name = 40
  • Report Folder Name = 40
  • Report Type Name = 80
  • Dashboard Name = 80
  • Dashboard Folder Name = 40
  • List View Name = 40
  • Custom Object Name = 80
  • Record Type Name = 80
  • Record Type Description = 255
  • Custom Field Label = 40
  • Field Help Text = 510
  • Field Description = 1000
  • Picklist and Multi Picklist LOV length = 255


Reference


Monday, August 14, 2023

Salesforce: Report Inline Editing Limitation and Issue

Report Inline Editing is a great feature where users are able to edit the data (multi fields and multi rows) easily via report. The same thing can be done via list view, but more flexible than list view:

  • Not all users able to create/edit public list view
  • Need to add record type as a filter in list view if the object has multiple record type
  • List view inline editing does not support controlling or dependent picklists

So, the report is a perfect option to cover the above issues. Report inline editing also honors the user has the right permissions to edit the data, only when these conditions are met for Object Permissions, Field Level Security, and Page Layout.

  • Users have edit access to the associated object.
  • Users have edit access to the associated field.
  • The associated field is included and editable in the page layout assigned to the user profile.


However, not all fields are supported by report inline editing, e.g. Opportunity Amount, for complete reference, check out this article Updating Multiple Fields Inline on the Report Run Page in Lightning Experience.

As always, nothing is perfect in this world and Salesforce's great community has put some ideas to make this feature better:


Issues

There is a minor issue related to data validation, e.g. you add a validation rule to maintain a business rule, however, if the system is unable to edit the record because of that rule, the system does not show clearly what is the cause of the error.


Another issue related to this Report Inline Editing: Dependent Field Requirement Should Match Record Pages (90 points), in summary, if the dependent field is marked as mandatory in page layout, however, no values of the dependent field are assigned to a value in the controlling field, inline report editing still requires the user to select a value, although no value is available in the dropdown too.


Reference:


Salesforce field deletion

In a blog written many years back Delete Custom Field, we shared items that will block and allow for field deletion.

Undelete field in Salesforce is also very simple, it will restore the field with data, but the admin need to note and perform a few actions as mentioned here:


Fields deleted with the data will be stayed in the "recycle bin" for 15 days before it will be hard deleted by Salesforce.

A few items to note when the fields are in the recycle bin:

  • You can see and open field detail from the object "Fields & Relationships" menu then click the "Deleted Fields" button
  • The field API name will be changed with an additional _del, such as Test_Date__c --> Test_Date_del__c
  • You can no longer query the field
  • The field metadata will no longer exist


To check who and when delete the custom field is deleted, check the "View Setup Audit Trail", the action should start with "Deleted custom field " 


Reference:


Tuesday, July 4, 2023

Salesforce: Query on Group and GroupMember

Group object is quite unique as it stores multiple types of data, from Public Group, Queue, Role, etc., you can see all the Type values in this article Group.

Note: The Type for Public Group is Regular

Sample query: SELECT Type, COUNT(Id) FROM Group GROUP BY Type


For user members in Group and Queue can be a query to the GroupMember object. Sample query:

All queue with queue members
SELECT Id, GroupId, Group.Name, UserOrGroupId FROM GroupMember WHERE Group.Type = 'Queue'


All public group with public group members
SELECT Id, GroupId, Group.Name, UserOrGroupId FROM GroupMember WHERE Group.Type = 'Regular'


All inactive users in a queue or public group
SELECT Id, GroupId, Group.Name, Group.Type, UserOrGroupId FROM GroupMember WHERE UserOrGroupId IN (SELECT Id FROM User WHERE IsActive = false) ORDER BY Group.Name


Reference:


Tuesday, June 27, 2023

Salesforce Data Storage

When your company purchased a Salesforce org., it will be allocated with a certain space of data storage, plus the number of licenses acquired and type of Salesforce edition. For the details, check the references below.

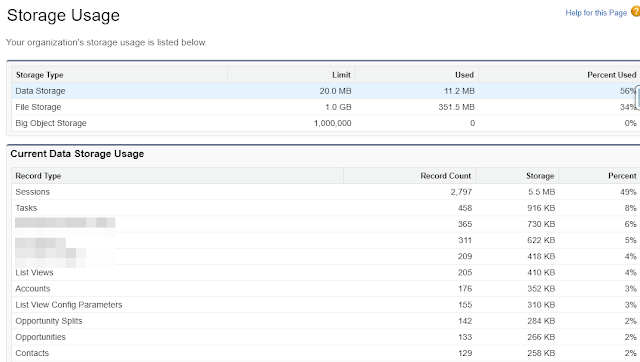
You can see the Used Data Space from Company Information in the setup menu. The screenshot below shows that Org has used 56% or 11.2MB of the allocated data storage.


To get the details of which object used the storage, navigate to Storage Usage under the setup menu.


Few things to note:

  • Attachments will use file storage, not data storage. But Email Messages will use data storage.
  • Most records are roughly 2 KB with some exceptions, see this article
  • such as Person Account (4KB for an Account and a Contact)
  • EmailMessage records count as the actual size of the Email stored in HtmlBody and TextBody fields, e.g. a 100-KB email message used 100 KB of data storage space
  • Rich text fields in an object still count as 2KB for each record
  • Archived activities are not removed from Salesforce, and they still count for the storage usage


Reference:


Sunday, May 14, 2023

CRM Analytics: Multivalue field

We shared a blog about working with multivalue fields almost two years ago with dataflow, where we read the multivalue field as a text field and used the computeExpression node to create a multivalue field. 

In this blog, we have something similar, except the source field is a text field separated by comma.

Here is the sample data in Salesforce:


The need: to have a list widget in CRM Analytics, so the user is able to filter the dashboard by Segment, where it should be a single, from the above screenshot: AA, GB, MM, SMB. So, if the user selects SMB, this will filter the data to ABT Inc, Adams335 Inc, and Adams991 Inc.

Solution: we can use dataflow as explained in the previous blog, or make use of the recipe as below screenshot: 


We can make use of both original and newly created fields from the recipe in the dashboard, use the text field in the table, and the multivalue field in the list widget:


Tuesday, May 9, 2023

Salesforce: Dynamic Forms controlling Field Type

One of the benefits of using the dynamic form is the ability to show and hide fields live based on 

  • Record field value selected or entered
  • User, e.g., profile, time zone, custom field, etc.
  • Parent record fields

But, not all field types can be used as a controlling field, as per the Summer '23 release, here is the list of field types that can be used: 

  • Auto Number
  • Checkbox
  • Currency
  • Email
  • Formula (Number) 
  • Formula (Text)
  • Number
  • Percent
  • Phone
  • Picklist
  • Text
  • URL

The following types are not supported as a controller field:
  • Date
  • Date/Time
  • Lookup
  • Picklist (Multi-Select)
  • Rich Text Area
  • Text Area

You also can set filter logic (AND, OR) if there are multiple filters.


CRM Analytics: Adding existing widget to different layouts

Background: We have a CRM Analytics dashboard with default (web) and mobile layout. As the business grows and changes, we need to add more widgets to the dashboard.

Adding widgets to a dashboard is easy by dragging and dropping the new widget into the canvas. But, doing the same activities two times on web and mobile layout is not fun.

So, here is the step to "copy" the widget from one to another layout:

1. Edit the dashboard

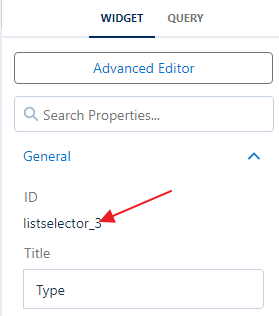
2. Find the ID of new widgets in the source layout

Note down the widget ID.


3. Open the target layout

Look for the widget Id in "Unused Widgets", and drag it to the canvas of the new layout. If you do not see this, click the gear icon (Dashboard Properties) at the upper right of the screen.


Sunday, April 23, 2023

Salesforce: Dynamic form by Record Type

Background: Universal Container uses many record types in the Case object, one of the new requests is fit to use the dynamic form feature, but does not want to impact all existing record types which still use page layout.

Solution: create a new lightning record page (or clone from the existing one) and assign it to:

  •  A specific app
  • The new record type
  • All profiles that will use the new lightning record page 


Reference:

Page-level ad