Pages

Showing posts with label AppExchange. Show all posts

Saturday, November 25, 2023

Image Upload on Salesforce: The Capabilities and Limitations

Are you already using images on Salesforce? If not, you should be, as making your Salesforce more visual has benefits that exceed simple time saving and productivity increases. Image usage can empower your end users to do their jobs in the most effective way possible.

Here's how you can upload images natively in Salesforce:

1. Uploading files through standard buttons (and in Flows)

The standard “Upload File” button under the “Notes and Attachments” section can be used to upload images to Salesforce.

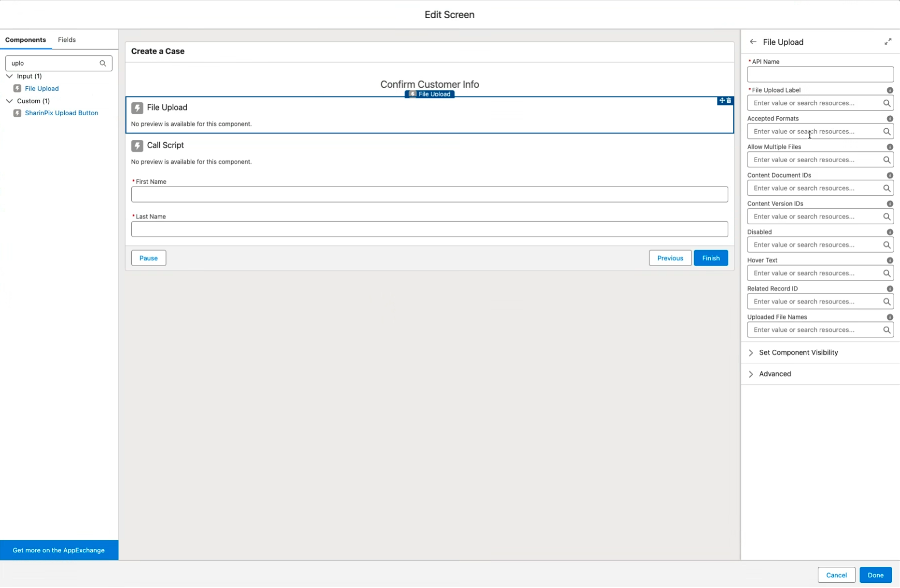
Additionally, the same function exists as a lightning component so that file (and image) upload can be used as a part of flows or self-developed screens. Through this method, you can add an Upload button to any of your flow screens.

2. Working with Images in Rich Text Fields

It is possible to upload pictures to the rich text field in Salesforce, the process is very easy, and the image is stored as a content document that will appear as a visual in the rich text field.


3. Take pictures and upload from your mobile device

The upload file and add images in rich text are also available on mobile. Doing so, lets you allow your users to open their device camera or device camera roll on either iOS or Android from their Salesforce mobile application. They can then snap photos and upload them directly to Salesforce. But also pick any pictures already taken from the camera roll to upload.

A component named Upload image and annotate is a good demonstration of what a developer can do in Field Service using the latest API available. As of now, this is only limited to being used from the menu item and is not applicable to flow. And only to be used by developers as it is only available as a source code as of now.


What are the limitations with uploading images in Salesforce?

While the Salesforce stock methods for uploading images may be suitable for you depending on your use case, there are limits for those who need to make frequent or heavy image photo uploads. Here are the principal limits for image upload in base Salesforce:

1. Rich text field upload limit

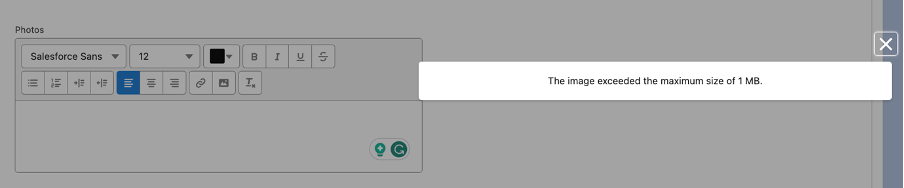
When you upload an image through the rich text field, it’s saved in the rich text data as a file, this file storage is limited to 1 megabit per image. This is a huge limitation for the type of image you can have based on file size and quality. That limit is especially hindering for users who use pictures taken from a mobile device, which naturally exceeds this limit.

 To put this in perspective, the average size of a photo captured with a newer iPhone is around 3 MB. If your end users are trying to upload files of this size, they will hit a roadblock that looks like this within Salesforce:
If you need to upload large images of any size or format and need them inserted in the rich text field, SharinPix has the solution for storing and presenting the image in the rich text field. 


2. Android upload limit

Many people in the USA are using Apple products for both their computer and cellphone needs, and those people as Salesforce users won’t have any problems uploading multiple images to Salesforce from their IOS devices. But it’s not always a guarantee that the users operating in your org will have an iPhone or an iPad at their disposal. 

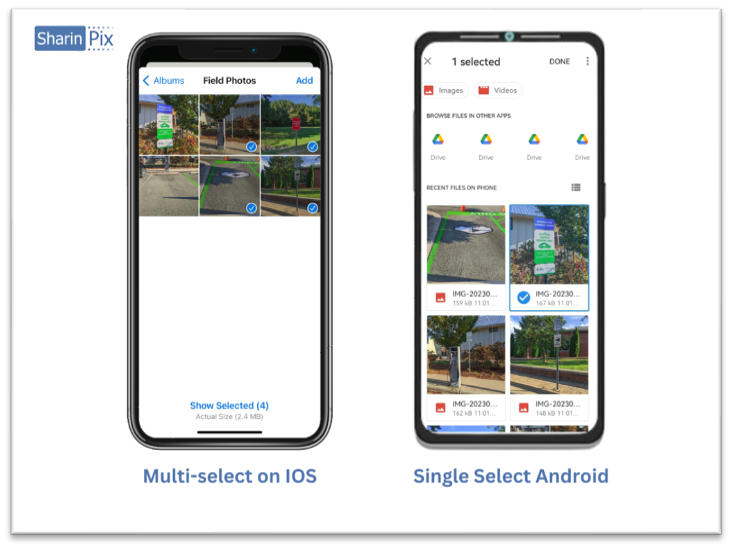
For Android device users, even simply uploading photos is an incredibly time-consuming task. The current version of APIs used by the Salesforce Mobile App blocks Android devices from uploading multiple images from the camera roll at one time. This problem could be solved in the future through updates, but for now, it’s still a roadblock for Android users.

Take a look at these side-by-side screenshot examples of the experience on IOS versus Android for uploading multiple images to Salesforce:

3. Metadata is not available

With the standard upload methods in Salesforce (add file button, file upload component, rich text field, or otherwise), you don’t have access to some crucial information in the metadata by default. These data can be extracted or included with image upload using dev tricks with an external API, but it’s extra manual work.

These limitations exist because of concerns about technological privacy, where users don’t want data (location, date, time, etc.) associated with an image. So, operating systems and security services automatically clean this data out before upload.

Even if the data was uploaded along with the image, it wouldn’t be automatically exposed as a field in Salesforce, making it difficult to use efficiently. With the growing strength of AI capabilities today, it’s more important than ever to use metadata such as time and location to verify that an image is genuine and that you can trust the users who provided it.


4. Salesforce storage limitations

Storage costs on Salesforce could pose a huge problem for users who are uploading large amounts of images, regardless of origin. There is technically no limit to how much file storage you can have, but having to constantly increase that amount takes time and communication with Salesforce and can be impossible to accurately predict.


How to make Image usage on Salesforce easy? 

Using photos in Salesforce should be easy, but it’s a complicated headache that will cost you a lot of time and money. SharinPix exists to make it easy! We can help you unlock pro photo usage on Salesforce. SharinPix has everything you need to edit, resize, annotate, and watermark without leaving Salesforce.  


SharinPix will help you operate beyond the limits mentioned in this article as well as the other limits that exist within Salesforce. SharinPix will facilitate image upload on all fronts, allowing bulk uploads through drag and drop with features exposing metadata as usable information in Salesforce.

You can visit the SharinPix AppExchange listing to learn more about the solution or chat with one of our Visual Experts, who will be able to show you exactly how to get the smoothest visual experience in Salesforce. 


Author:
Jean-Michel Mougeolle
CEO of SharinPix
Salesforce MVP


Monday, August 18, 2014

Salesforce #Cleanup with Field Trip

This would be my 3rd blog of AppExchange product, after: DupeCatcher, Enabler for Excel part 1 and part 2. Over years when consultant comes and go, new admin on-board and leave - many enterprises do not even know what is the purpose of custom objects and custom fields created in their org, would it be just used as reference table or something else needed at other app.

Take a Field Trip! This utility lets you analyze the fields of any object, including what percentage of the records (or a subset of your records) have that field populated. Get it for free from AppExchange.

Let me show how easy to use this tool:

1. Install from AppExchange
Follow above linked to install in a sandbox or production instance. Once installation done, you should see it in Installed Packages, from SetupInstalled Packages


2. Field Trip Tab
Click '+' tab (or URL https://xyz.salesforce.com/home/showAllTabs.jsp - change xyz to your Salesforce instance) to show All available tab and look for Field Trip tab


3. New Field Trip
Click New Field Trip button to start analyze.


Enter a Name, select the Object, and optional for criteria if you do not wish to analyze not whole records for that object. Click Save button when done.


4. Analyze It !
Click Analyze button then Begin Analysis in the next screen. It may take a while for Field Trip to get the data.

You can monitor the progress from Apex Jobs (Setup | Jobs | Apex Jobs). Once done, you should get email with subject "Field Trip Processing Complete: field trip name" which contain a URL link to the to see the analyses result. The status in the Apex Jobs also will update to Completed, looks for with Apex Class = analyzeObject


5. Report It !
Create new report with report type Field Trip with Field Analyses


Add filter to the report with Field Trip: Field Trip Name equals Singapore Account (this is field trip name - see step 3 above for my sample)
You can use standard report feature such as bucket field to make it easier to read for a high level result.


If you see sample above, we have 269 fields in Account object, 103 fields of them for Singapore Account do not have any value populated, 49 fields have only 0-5% value populated. We can easily see from the report that more than 50% of field is not really used, which mean it may good to remove.

Note: if you have ETL or other SOAP API tool accessing your data with fix fields in query, you need to check with integration team, otherwise it will break the integration. Another tip, before hard delete the field, you can just remove visibility permission from field level security to all profiles.


Reference:


Sunday, June 29, 2014

"Enabler for Excel" for Salesforce (part 2)

This blog is continuation from part 1. Some features not really directly access Salesforce data, but it help admin in analysing data downloaded from Salesforce to Ms Excel.

1. Convert IDs from 15 to 18 chars
This is very simple feature which will do convert Salesforce Id from 15 to 18 characters. Please not that both Id (15 and 18) are valid Id. So, what is the different?
- 15 character Id is case-sensitive, where when you work in Ms Excel function, such as VLOOKUP(), it will not check case sensitivity and cause duplication.
- 18 character Id is case-insensitive, so it is easier when work in Ms Excel.

You just need to select a cell or row of cells with 15 IDs character and the result of 18 characters ID will overwrite the original 18 characters IDs.

2. Diff
This is another simple feature to compare value of cells in 2 columns, you can choose for case-sensitive or case-insensitive. This tool will not compare value of cell in order.

3. Settings
In Setting, you can adjust batch size of update, insert and delete separately. Also path of log file and it will you if any new version available.

4. Field Utilization
Heard about Field Trip app in AppExchange? This feature is almost similar, but you do not need to install anything in your Salesforce.
Often system admin add new field based on some requirements, but over the time those fields no longer used. This feature is good to analyse field utilization when we need to do fields clean-up
- Select an object
- Select fields you want to analyze, hold Ctrl key to select more field
- You can leave Criteria text area blank to select all data
- Click OK button
- It will create a new worksheet with information total number of records with column: Field% utilized and No. of records of that field


5. VisualForce from Layout
This is pretty cool feature for new developer interested to learn Visualforce page. It will create a visualforce markup file from a page layout in Salesforce.

6. Analyze Layouts
This last feature will get all fields information of an object, information will show in columns:
  • Object Name
  • Label
  • Field Definition/Description
  • Field Type (Roll-Up Summary will show as Formula field)
  • Pick list Values (if applicable)
  • API Name
  • Calculation (if formula field)


Friday, June 27, 2014

"Enabler for Excel" for Salesforce (part 1)

Enabler for Excel is a Microsoft Excel add-on enables easy mass updates, inserts, and deletes Salesforce data directly from Microsoft Excel. It has extra functionality of determining which fields are in and out of layouts, as well as a tool for fields utilization calculation. Visualforce from layout page generation. It is listed in AppExchange, so it mean has passed through security check by Salesforce team.

For those of you who used and like Excel Connector, a nice tool for admin to works with Salesforce data easier using Microsoft Excel, but it has been not updated by the developer, the latest version using API 16 and was written with Windows XP and Office 2003. So, Enabler is a good option for those of you looking for Excel Connector replacement.

I found Enabler for Excel is an awesome tool for Salesforce admin, it works with latest Windows OS machine (tested in Windows 7, Windows 8 and Windows 8.1) and latest Microsoft Excel 2010 and 2013.

You can download the add-on from Taralex website, as I am writing this blog, latest version 1.9.0.2, special thanks to Alexander Tarasevich who write this add-on and share it for free (as of now).

You can found the documentation and installation guide from their wiki site. Once you install it successfully, you will find new ribbon called Salesforce in you Microsoft Excel.


1. Web Login 
Type in your Salesforce username and password into Salesforce website, this option do not need security token. Or you can login manually and store the password with security token.

2. Get Data
As Salesforce admin, I like this function very much. Let say you want to extract data from Salesforce and you already have criteria, maybe Account Name or Account Id, etc

How it works?
- Put your criteria data into a columns, let say 20 rows of Account Id
- Click "Get Data" icon

- It will open Get Data window and click "Grab a list..." icon

- Highlight your mouse over the data and it will copy them to "Selected values" window

- Close that window and the value will be available in Get Data window

- If you familiar with SOQL, you can just type the query syntax, example: 
SELECT Id, Name FROM Account WHERE Id IN ('0015000000qiJe9AAE','0015000000QqeisAAB','0015000000psTSSAA2') ORDER BY Name

- Once you get the SOQL ready, click Execute button. Enabler with create new sheet and name it as the object name. But if you already have the name in worksheet, it will create sheet with object name (1) or (2) or continue.


3. Refresh
Let's say you type in your soql query and hit Excute button, if nothing wrong with the query syntax, it will return data from Salesforce into a new worksheet. Save your excel file and done. The next time when you open that Excel file again, if you click Refresh icon, it will update data in that worksheet from Salesforce, cool, isn't it? 


4. Reports
This feature is pretty cool, it access the report directly from Salesforce and present the data in Ms Excel directly. On top of that, when you click the button, the order of report is exactly the same as in Report tab in Salesforce. When you run the report in Ms Excel from Enabler, the report position in Salesforce will move to the top (if your report in Salesforce select as "Recently Viewed")

5. Delete, Insert, Upsert, Update
As normal delete and update process, you need to provide record Id. It will prompt for Map Columns. While when you choose ".... Selected", make sure you select correct data, otherwise it will throw error. 
Once done, it will provide the Operation result and ID at the right of the data in Ms Excel.


To be continue in part 2...


Sunday, May 11, 2014

DupeCatcher for clean Salesforce data without duplication

Clean data is one of the most important aspects to have your Salesforce CRM working perfectly, this is included data quality and no duplication. For data quality, you can set required field, mandatory field in page layout, validation rule until apex trigger code. However, to prevent duplication, it will be troublesome to build your own code/configuration.

There are many tools available in AppExchange to prevent data duplication in Salesforce, whether created by Salesforce lab or external party, some of them are free or paid.

In this blog, I would like to introduce DupeCatcher. DupeCatcher is a real time duplicate lead, contact and account blocker. It can provide duplicate warning records and associate tasks with them. It is a product by Symphonic Source, which is also creator of a popular data deduplication tool called Cloudingo.

 A few items I would like to note for DupeCatcher:
  • It is FREE!!!
  • It is Native (runs on the Salesforce platform, ensuring availability, performance, and data security)
  • It is a No Limit app (do not count against the limits of your Salesforce organization)
  • It is simple, you just need a few clicks to setup
  • It works for Lead, Account and Contact
  • It works for real time data entry, but does NOT deduplicate on mass import and deduplicate records already in Salesforce
  • It is NOT case-sensitive. 
Once you have install DupeCatcher from AppExchange, you will find a new app in your Salesforce.


Step-by-Step to configure this app:
  1. Click DupeCatcher app as in screenshot above
  2. Click DupeCatcher Filters tab
  3. Click New button
  4. Enter Filter Name; select an object; select if action only insert, or update or both; enter error message; and few more options.
  5. You can hover your mouse over yellow question mark icon for help text
  6. Click Save button
  7. Scroll down to DupeCatcher Filter Rules filter to create matching rules, you can have up to 12 rules. If you have more than 1 rule, the relation between each rules are always AND. If you need to have OR relation, you need create new DupeCather Filter for each scenarios.
When you choose Action = Do Not Insert or Do Not Update, this option will block user not able to save data when duplicate data detected based on active Filters.


If you select Action = Report Duplicate, this option will not block user when user enter duplicate data, but it will create alerts. You can notice in  Filter Metrics section, how many duplicate records (see Potential Duplicate Count) in how many set of data (see Duplicate Alert Count, data will be shown in DupeCatcher Duplicate Alerts related list).


You can click Alert record to see Potential Duplicate data:


For more information, go to DupeCatcher website, see this FAQ and watch this video in Youtube.

Friday, March 22, 2013

How to report Chatter records following by users?

As of the Salesforce Spring '13 release, the maximum number of people and records a user can follow in Chatter is 500. Once a user hits 500, the user is unable to follow any user or record; if you need more than 500 limits, you can log a case to Salesforce support to get this number increased to 2000.

Question, how do you check the number of people + records that have been followed? Easy answer, click on the user profile, and it will show in the right panel of count and items "Following". Then, you can click "Show All (number)" to see all records and people that user are following.


But, is there a way to list all the following items for all users? We cannot find this in the Chatter report. If you are familiar with SOQL or Data Loader, this is possible...

The object that stores all 'following' is EntitySubscription.
EntitySubscription represents a subscription for a user following a record or another user. A user can subscribe to a record or to another user. EntitySubscription is available in API version 18.0 and later.

Here is the simple SOQL:
Select e.Id, e.SubscriberId, e.ParentId From EntitySubscription e order by e.SubscriberId
SubscriberId here is UserId, and ParentId is any object or user following.

If you do not want to auto-follow the records you created (so you do not easily hit max 500), you can configure it from Setup - Personal Setup - My Chatter Settings - My Feeds. Uncheck Automatically follow records that I create.

There are also applications in AppExchange you can install to auto-unfollow Chatter items based on a set of rules; this app was created by Salesforce Lab:
- Cloud Swarm 3 - Chatter Auto Follow - Unmanaged - EE / UE / DE
- Chatter Unfollow Rules - Managed


Reference:

Page-level ad
