Pages

Friday, May 3, 2013

Salesforce to Salesforce: manual accept and stop sharing


Continuing from previous blog about partner blog. A user said that we supposed not to accept everything send by our partner, it maybe 'junk' data. So... how? Easy, just set in Subscribed Object in Connections not to Auto-Accept.


How to Accept?
Go to object tab, example: Account tab (this will accept related child objects automatically, example: Contact, Opportunity). You should see "Accounts from Connections" in a related list and you can create new view as preferred.


User can manually accept each record. To note, there is NO "reject" link, so to reject an incoming record, you need to notify publisher to stop sharing.

How to know record being shared?
You can run a report or create a view with filter:
- Received Connection Name for record shared to us
- Sent Connection Name for record share to partner instance


How about if we do not want user able to stop sharing?
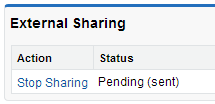
Remove 'External Sharing' related list. It is bad we cannot configure to hide the "Stop Sharing" link. But "Stop Sharing" link will show based on user permission.
The users that will see the link are:
1. Users with Modify all Permission
2. Users owning the record
3. Users above the record owner in the role hierchy

Wednesday, May 1, 2013

Salesforce to Salesforce: how is the owner in partner instance?

In previous blog, we have discuss on how to set up Salesforce to Salesforce between 2 instance. So your data can transferred to your partner Salesforce without 3rd party and complex ETL process.

A user come to me this morning, for some reason, he want to know who is the owner of the account and opportunity in partner instance, because once record transferred over to our Salesforce, the owner will be change to the connection user and no information who owned it in partner instance.

Solution:
  • In Publisher instance, create new text field called 'Corp A owner' in account
  • Write a simple trigger to populate owner name from Account to this new field
  • Publish the newly created field in Salesforce connection
  • In Subscriber instance, create the same text field 'Corp A owner' in account
  • Map it in Subscribed Objects
  • Done
Once, the data transferred over, we will know who is the owner for that account, so our Sales Rep can directly contact Sales Rep in Corp A. And, we also can use the same way to transfer over Sales Rep in our company to partner Salesforce for two-ways data sync.

Trigger reference:
trigger updateTextOwner on Account (before insert, before Update)
{
    for (Account accs : Trigger.new) {
            User u = [Select Id, Name from User where id = :accs.OwnerId];
            accs.Text_Owner__c = u.Name;
    }
}

Salesforce to Salesforce: Getting Started !


Salesforce to Salesforce is great feature from Salesforce:
  • Allow different companies which using Salesforce or Force.com to transfer data without 3rd party
  • Out-of-the-box feature from Salesforce in any edition (Group to Unlimited edition)
  • Real-time data sync
  • One-way or Two-way
  • Any object and fields can be configured
  • Manual or Automatic data transfer method in Publisher instance
  • Manual or Automatic to accept record in Subscriber instance
  • As Publisher and subscriber with multiple Salesforce instance
  • Free of Charge

Limitation (as of 1st may 2013):
- Not able to modify notification email
- Need to write apex trigger to automate data transfer


How to Start?

1. Enabling Salesforce to Salesforce (S2S) 
Setup - App Setup - Customize - Salesforce to Salesforce - Settings
Activate Enable checkbox, please note that enabling Salesforce to Salesforce is not reversible, however, you can deactivate connection create.


2. Setting up Connection
  • Once you activate S2S, system admin will find new tab "Connections".
  • If your partner contact have not in your Salesforce, create your partner Contact (and Account) with email address, your partner will receive invitation email in this email address.
  • Determine a connection user, the connection owner will receive all email notifications including system notifications in case there is a functional error when the connection is inserting/updating a record. Additionally, the connection owner will be assigned as the default owner of any new records, though this may be overridden by any assignment or other rules that determine record ownership.
  • Enter all information needed enter, click "Save & Send Invite", your partner will receive email to accept it.
  • Once the invitation is accepted, the connection between your Salesforce and partner Salesforce is established, no data are shared yet at this stage


3. Publishing Objects
Let's say you will send data from your Salesforce to your partner.
  • Go to Connection created and scroll to 'Published Objects' related list, click 'Publish/Unpublish' button.
  • Select object you need to publish and click Save
  • Click Edit link in Action column for each object, you can select fields you want to be published to your partner


4. Subscribing to Published Objects
Now, your partner need to subscribe for objects you have published.
  • Go to Connection created and scroll to 'Subscribed Objects' related list, click 'Subscribe/UnSubscribe' button.
  • You will find objects being published from partner company and you need to map it to your object. It is important here to determine if you want to Auto-Accept record transferred over for each object. If this is not select, the connection user need to accept it manually.
  • Click Edit link in Action column for each object, you need to map fields between your partner Salesforce field with yours.
  • Click Save and Done.


5. Forward record
Up to Step 4, connection and fields mapping has been established. Out-of-the-box, user need to forward record they need to transfer.
  • Go to record page layout and scroll down to 'External Sharing' related list.
  • For Account, click 'Forward this Account' button, you will see option to forward related objects to Account which has been configured in connection above, also option to send notification email.
  • Once a record is forwarded, it will be shown in 'External Sharing' related list and at the top of page layout.


6. Mass forward records
If your profile have 'Manage Connections' permission, you can forward records in bulk.
Go to object tab, select a View. You will find button 'Forward to Connections'. Select records to forward and click that button.

7. Make it Automatic
From step 5-6, we are talking about to forward record manually. But, in many cases, business need this to be automatic. To achieve this, we need to write apex trigger which insert record to PartnerNetworkRecordConnection object. Sample apex code:
PartnerNetworkRecordConnection newConnection =
  new PartnerNetworkRecordConnection(
      ConnectionId = networkId,
      LocalRecordId = newContact.Id,
      SendClosedTasks = false,
      SendOpenTasks = false,
      SendEmails = false,
      ParentRecordId = newContact.AccountId);
insert newConnection;


Reference:


Friday, April 26, 2013

Chatter Hashtag report

On top of Chatter activity statistics and influence rank report in earlier blog (introduce in Winter 13 release). We also can run a report on usage of public hashtag (#) topics. Public hashtag topics are those used on profiles and in public groups. For privacy reasons, hashtag topic usage reports DO NOT include hashtags used on records or in private groups.

To create this report, you need to create new Custom Report and choose the Hashtag Definitions as primary object. You can select from the following fields:
• Created Date — Date the hashtag topic was created
• Hashtag Text — Text following the hashtag (#)
• Hashtag Count — Number of times the hashtag is used
• Normalized Hashtag Text — Text following the hashtag (#), without capitalization and punctuation


While for Chatter Activity report as in earlier blog, you can find following fields:
• Comment Count — Number of comments made by the parent
• Comment Received Count — Number of comments received by the parent
• Influence Raw Rank — Number indicating the parent’s influence rank, which is calculated based on the parent’s Chatteractivity statistics, relative to the other users in the organization
• Like Received Count — Number of likes received by the parent
• Parent — User name
• Post Count — Number of posts made by the parent


Chatter Usage and Activity Report


For organisation using Chatter, you may need and interested to know how Chatter usage in your company.

1. Chatter Usage Dashboards
This is free app from AppExchange, you can install from this link
From this dashboard you can see:
- top 10 most popular users
- top 10 most popular groups
- number of chatter groups (private vs public)
- total User feed & group feed
- top users post to group
- etc


2. Chatter Activity and Influence report
Create custom report type
Click on Setup - Create - Report Types - New Custom Report Type and choose "Chatter Activity" object. Give it a name "Chatter Activity and Influence" and store it in the folder of your choice. You can then go to the Reports Tab and find the report type you just created and click on Create.


Thursday, April 25, 2013

Salesforce "Email Privileges Revoked" error message

When you write apex code in Salesforce to send email in Sandbox instance, you may find error "Email Privileges Revoked" error message.


You may never see this error earlier. What is the caused?

As per Spring'13, Salesforce have added a way for you to control the type of email your organization sends, with the new Access level setting in Setup > Administration Setup > Email Administration > Deliverability. 


While you typically won’t change this setting day-to-day, these options can be useful when you need to temporarily suspend outbound email or when you’re working with sandboxes, for example:

  • No access: Prevents all outbound email to and from users.
  • System email only: Allows only automatically generated emails, such as new user and password reset emails.
  • All email: Allows all types of outbound email. Default for new, non-sandbox organizations.
Tip: The System email only setting is especially useful for controlling email sent from sandboxes so that testing and development work doesn’t send test emails to your users.
  • Newly created sandboxes default to System email only.
  • Sandboxes created before ’Spring 13 default to All email.

You may not be able to edit the Access level if salesforce.com has restricted your organization’s ability to change this setting.

Summary: by change access level to "All email", it should solve the issue in Sandbox.


Page-level ad