Dreamforce 21 announced that Flow is the future of Salesforce, it will replace Workflow and Process Builder and is also friendly for admin without coding background. The flow itself is not something new but it has been added with many features recently, at least can do all workflow and process builder can do.
Here is the business use case: ABC Inc. would like to have a simple "quick create" form that allows users to easily give feedback or idea to enhance the system, from anywhere in Salesforce Lightning, does anyone still in Classic ⚡
Solution: Screen Flow
1. Create a custom object to capture the data
- Create all the fields needed
- Add a custom tab if needed
- Enable the object for reporting, allow activities, track field changes, and allow search
- Set the object permission by profiles, and fields level security
2. Create screen flow
Add 3 elements in the flow: screen for form, create records, screen for thank you

Main screen element, nothing fancy here, just add the input type and set it as required, for this example, type values are derived from a picklist field and set as Picklist Choice Set. You can add emojis to make it fun 😊


Create Records element, this is pretty simple, just map each screen component as a value to a field of the object, and remember to select "Use separate resources, and literal values".
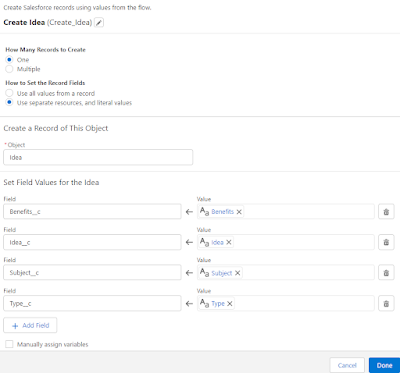
** You can add a fault path, in case the system is unable to save the record, such as because of validation rules or etc.
Thank You screen element, the purpose of this screen is simply to tell the user that the data has been captured. In this sample, I will hide the button at the footer.

You can try to debug or run the flow to make sure it will run correctly.
3. Add Flow to Utility Bar
Few items to note here:
- The flow must be activated
- Only Screen Flow will be available
- Users must have "Flow User" enabled in the user detail, otherwise, the user will not see the flow in the utility item
There is really nothing to be configured here, it is just standard items such as label, icon, panel width, panel height, and of course, the most important is to select the correct flow.
Done and the form looks pretty nice and fits into the utility bar.

No comments:
Post a Comment