Pages

Thursday, March 31, 2022

Remove Personal Information when sharing Office documents

Microsoft Office by default documents stores your personal information when creating or editing an office document. You can remove that information like comments, version history, and metadata containing personal information like document author, and date of creation, before sharing the file with other people externally. The Document Inspector feature in Word, Excel, PowerPoint, or Visio can help you find and remove hidden data and personal information in documents that you plan to share.

For Windows

  1. In an open Word document, click File then Info.
  2. Select Check for Issues and choose Inspect Document to control what type of content you want to be flagged.
  3. To start your search, click Inspect and then Remove all the information you want to be edited from your content.

Repeat the process by clicking the Reinspect and Remove all buttons until your document is clean. Click the Close button to save your changes


Wednesday, March 30, 2022

Streamlined Salesforce Data Collection

Salesforce out of the box offers web-to-lead and web-to-case, where we can create a simple form and publish it to our website, our customers or prospects can submit their questions or issues, and the data will be stored in Salesforce. However, if you need a custom form for a specific purpose, such as order, request, etc. that links to Salesforce, you need to get developers to build force.com sites, which is not simple, takes time, and also takes a big effort to support and maintain.

In this blog, I would like to introduce FormAssembly, a platform that supports large and complex data collection workflows that require advanced Salesforce integration. You'll benefit from FormAssembly’s powerful, all-in-one data collection platform and visual workflow builder that doesn’t need a team of developers to build and maintain the form as your business changes. Simply use FormAssembly builder (with point and click, instead of code) to make the changes and publish the form to your website.

FormAssembly provides a secure, versatile, and scalable solution for solving data collection challenges for organizations across industries. With a user-friendly platform and intuitive builders, non-technical users can easily create web forms and data collection workflows for any use case no matter the complexity or security requirements. With a simple connector and integration setup, data flows seamlessly from people to web forms, then directly and cleanly into Salesforce.

A FormAssembly Enterprise or Compliance Cloud plan gives users access to several key features and benefits, including: 
  • Advanced Salesforce integration: Create or update data for standard and custom objects in Salesforce, prefill forms, use Dynamic Picklists, and more.
  • High security and compliance: Protect data with Section 508 compliance, spam protection, PCI DSS Level 1 Certification, encryption at rest, and TLS 1.2 secure forms.
  • Respondent authentication: Allow only authenticated users of LDAP, SAML, CAS, or Salesforce Communities (now Salesforce Experience Cloud).
  • No-code web form builder and workflow builder: Easily create custom web forms and build out complex data collection workflows without code or technical support.
  • 24/5 support by live chat, email, or phone: Receive friendly, helpful support from a dedicated and knowledgeable team (phone is for Priority Support customers only).

The Form Builder
FormAssembly’s web form builder provides a user-friendly, drag-and-drop interface that lets users easily create custom Salesforce-connected forms, edit themes, add images, and more.

1. Once logged into your FormAssembly account, you can start building a web form by clicking on “+ New Form” and choosing a blank form, template, Salesforce import, or clone of another FormAssembly form.


2. All forms are customizable, from text (drop-downs, radio buttons, text area, etc.) to images and themes. You’ll have the ability to add your organization’s logo and brand colors. 


3. Setting a form to active or archived status, setting a processing quota, and creating custom messages can all be achieved in the form processing options section.


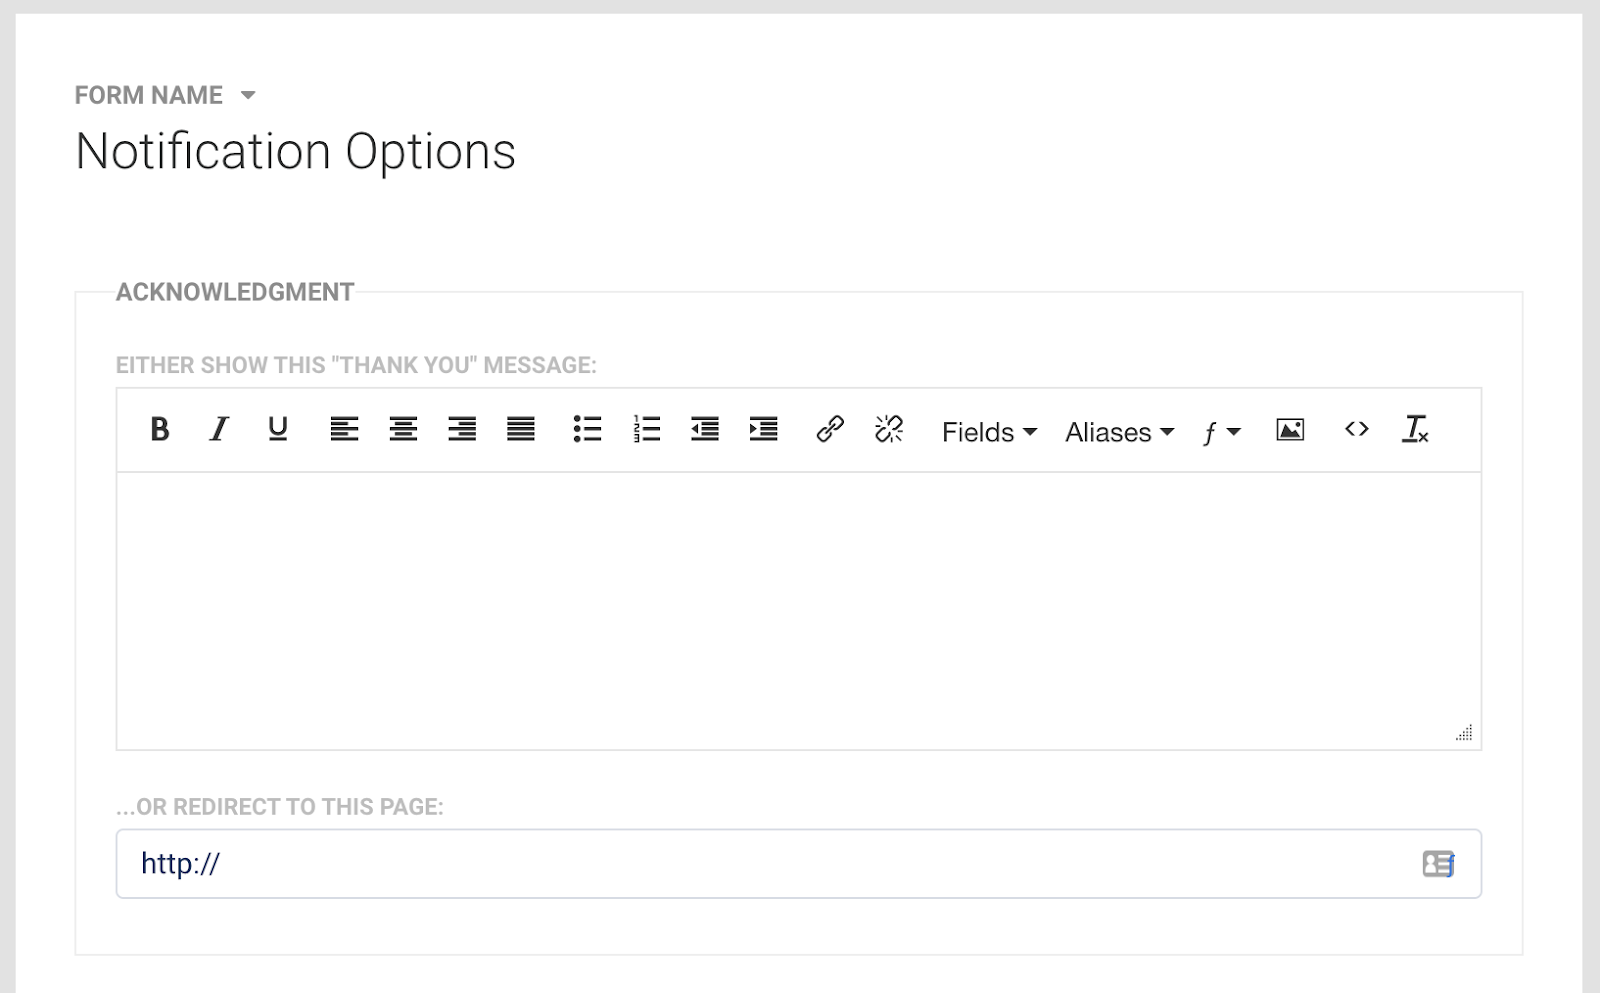
4. You can also customize a “thank you” message for a web form submission as well as set a URL for a page redirect.


Salesforce Integration
When it comes to Salesforce, FormAssembly makes this integration seamless and streamlined, while providing several powerful connectors. This powerful Salesforce integration lets users update and create records for standard or custom objects, prefill data, leverage multiple objects, and more. 

FormAssembly’s level of form customization and advanced integration is in most cases even better than Salesforce’s native options. This is why this external data collection platform is the go-to solution for building web-to-anything forms that send data seamlessly to your connected Salesforce Org.

Salesforce Integration Benefits
Leveraging FormAssembly’s platform and integrations offers several advantages that help solve common challenges of Salesforce data collection:
  • Eliminate manual work: Create or update records with Salesforce forms that work with any standard or custom object and even objects from AppExchange apps.
  • Enable form prefilling: Data pre-loads from Salesforce into a FormAssembly form, making it easy for customers to update information, which syncs back to your CRM.
  • Seamless file upload: Customers can easily attach files that upload to a specific Salesforce record when a form is submitted.
  • Complete live lookups: FormAssembly’s Salesforce Dynamic Picklist tool lets users complete live lookups to Salesforce from specific fields in a form.
  • Streamline processes: Embed and easily load FormAssembly forms in Salesforce Communities using the FormAssembly Lightning component.
  • Build forms in minutes: Easily create FormAssembly forms with your own Salesforce objects using FormAssembly’s Salesforce Import too.

Connecting FormAssembly and Salesforce
1. Within the connector section, you have the option to choose between form opened, form submitted, and after form submitted connectors. 


2. Once you choose the Salesforce Connector, click the “Configure button” to connect to Salesforce. Enter Salesforce credentials and allow access to FormAssembly and click the save button.


Learn More
To learn more about FormAssembly for Salesforce, visit their website or find them on AppExchange.


Monday, February 28, 2022

Salesforce: Rename Related List for Custom Field

When you add a lookup field in an object to another object, the lookup object will become the parent object, this is applied for both Standard and Custom objects.

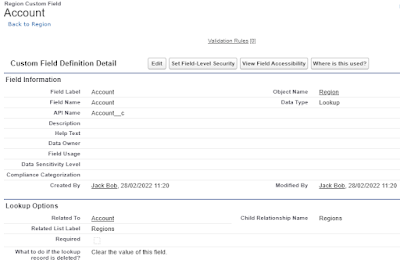
In this example: I have a custom object called Region with a lookup field to Account.


And if we go to the Account page layout, we can add Region as a related list.


How to change the "Regions" label to something else? Let's say it should be called "Supported Regions".

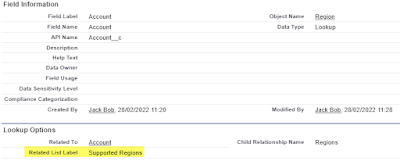
Let's go back to the Regions object, open that field and change the "Related List Label"


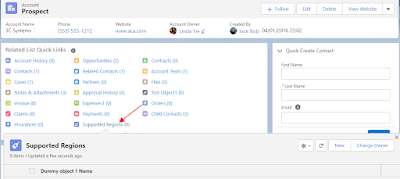
Refresh the account page and now should show "Supported Region"


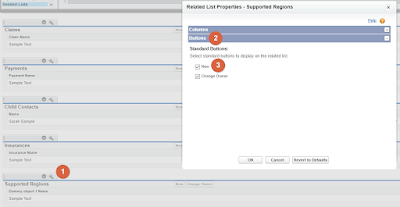
Bonus requirement: the New button should not be in the related list.

  • Go to Account page layout
  • Click Related Lists on the left panel, scroll down to the related list object
  • Click properties icon, click Buttons, then untick New checkbox


Monday, February 21, 2022

Salesforce: File Privacy on Records

By default, when you upload files from a record Related List, the file will be visible to all users who have access to the record. But, this can be changed by adding a field called File Privacy on Records in the Content Version page layout.


Once the file owner selects that checkbox, the file will not visible to other users, unless manually shared, but users with View All Data permission will be able to see those files.

Step to update the checkbox:
1. Upload the files from Related List, you can upload multiple files in one go

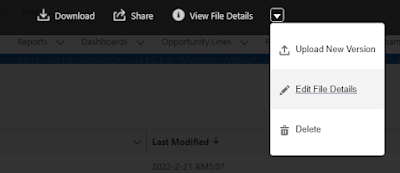
2. Open each file and click the arrow next to View File Details, then select Edit File Details

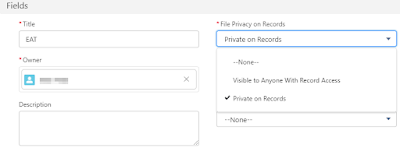
3. Change File Privacy on Records from Visible to Anyone with Record Access to Private on Records

Notes:
  • The file visibility does not roll up to users in the higher role hierarchy, so when the file owner sets this as Private on Records, the manager will not see the file, unless shared manually.
  • The file visibility does not depend on the related record owner but depends on the file owner.
  • If you query on ContentDocument object (prefix: 069), this is stored in SharingPrivacy field, P for Private on Records, and N for the default visible to anyone

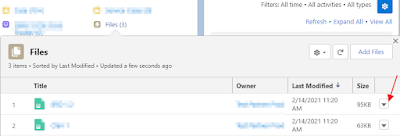
However, if you click the Edit File Details link from the Files dropdown in a related list, you will not see that checkbox, as mentioned in this article. I have created an idea exchange to vote.


Reference:


Salesforce: Opportunity Split Query

This is the continuation of the previous blog Forecast and Opportunity Split, in this blog, we will share more on Opportunity Split records.

SOQL
SELECT Id, OpportunityId, SplitOwnerId, SplitOwner.Name, CurrencyIsoCode, SplitAmount, Opportunity.CloseDate FROM OpportunitySplit WHERE SplitAmount <> 0 AND Opportunity.ForecastCategory = 'Closed' AND SplitTypeId = '1492v0000008opLAAQ' AND Opportunity.CloseDate > 2019-06-30 AND Opportunity.CloseDate < 2019-10-01 ORDER BY Opportunity.CloseDate DESC 


Summary:
  • The number of rows here is based on the number of split records that fit the criteria, so there is no summarized calculation as in ForecastingItem
  • The currency can be different based on the currency defined for the opportunity
  • The Split Amount is not roll-up to the manager.

Wednesday, February 16, 2022

Salesforce: Retrieve all fields from an Object

Config Workbook

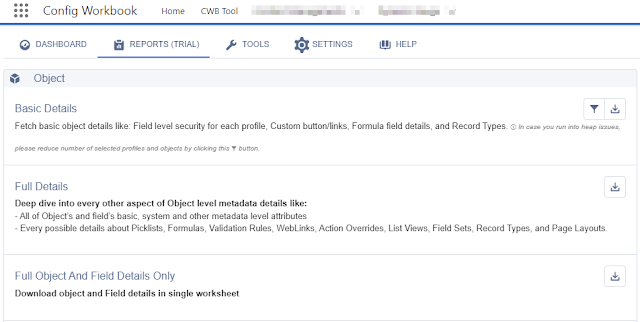
This tool is not free, but you can do a trial for a few analyses, and need to install it from AppExchange.The details provided are quite comprehensive, but missing a few important pieces of information.

Click CWB Tool tab >> Reports tab >> Full Object and Fields Details Only.


This will produce an Excel file with the following columns:
  • Field Name
  • API Name
  • Data Type, missing information if the field is a Formula field
  • Picklist Value, for Picklist field only, and not for Multi-Select Picklist  
  • Length, for Text and Long Text Area
  • Visible Lines, for Long Text Area
  • Default Value
  • Mandatory
  • External ID
  • Unique
  • Case Sensitive
  • Description
  • Help Text
  • Relationship, for Lookup: Related To (object name) and Child Relationship Name
  • Number, with Precision and Scale, for the length of Currency, Number, Percent field
  • Track Feed History
  • Track History

It also missing Controlling Field, Modified By, Modified Date/Time information.


ColumnCopy extension for Chrome browser

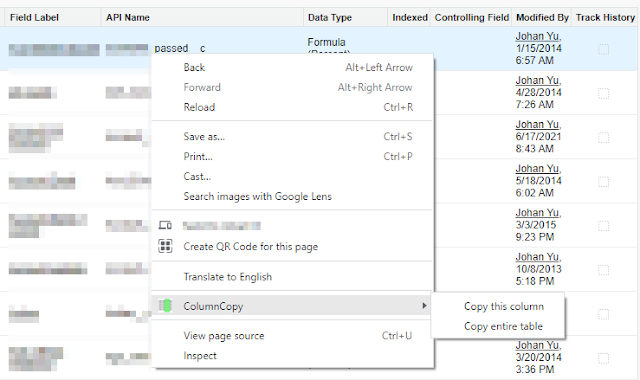
This needs to be performed in Classic (not Lightning) with Chrome (or Edge or Opera) browser, you just need to add ColumnCopy to your browser. Once the extension is added in your Chrome browser, go to the object's field page, right-click on the field table >> ColumnCopy >> Copy entire table >> paste into Excel.


You will get all information presented in the fields table:

  • Field Label
  • API Name
  • Installed Package
  • Data Type
  • Indexed
  • Controlling Field
  • Modified By (including Modified Date/Time)
  • Track History

* Indexed and Track History will not copy by ColumnCopy because they are checkboxes.

This is good enough if you just need to get basic field information quickly.


Salesforce Schema Lister

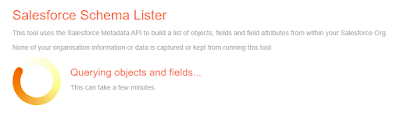
This tool uses the Salesforce Metadata API to build a list of objects, fields, and field attributes from within your Salesforce Org, this tool is part of the Toolkit for Salesforce, and please note this is a 3rd party tool, not by Salesforce.


The tool will scan all objects, instead of asking with objects that you would like to work with. This will work well if you are just starting a new org, but when working in a big org. (with hundreds of custom objects), it may take a few minutes or longer.

Once completed, you have the option to export the data into an Excel file, as a single tab or multi-tab (one object per tab).

What do you get in the Excel file?

  • Field Label
  • API Name
  • Type. including length (all fields), picklist values (including multi-select picklist)
  • Help Text
  • Formula, this is the raw formula for the field

SOQL

Query from FieldDefinition object.

Sample: SELECT DurableId, QualifiedApiName, Label, DataType, ValueTypeId, LastModifiedDate, PublisherId, Length, Precision, Scale, EntityDefinitionId, RelationshipName, ReferenceTo, Description FROM FieldDefinition WHERE EntityDefinition.QualifiedApiName = 'Account' 

You must have EntityDefinitionId or DurableId added as a filter, EntityDefinitionId refers to an object and DurableId for a field.

A few interesting fields from the query result:
  • DurableId, return ObjectName.QualifiedApiName for standard object and ObjectName.00Nxxx for custom fields
  • ValueTypeId, return id, string, boolean, integer, double, etc.
  • PublisherId, return System for standard objects, or Package Prefix name for installed packages

Full documentation here

Note: Because this is a query based on the user permission, the query result will be based on field (and object for lookup field) visibility for the login user. 
You don't option to retrieve Help Text here.


Custom Report Type

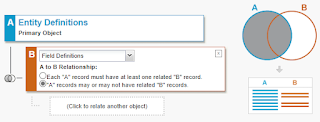
Create a custom report type with primary object = Entity Definitions with or without records from Field Definitions.


You can filter Durable ID (of Entity Definitions) to an object name to pull just fields of that object. Sample report:


Note Same as SOQL, the report runs based on the user permission, so the result will be based on field (and object for lookup field) visibility by the report running user.
You don't option to get Help Text using this method.


Salesforce DevTools

This is another Google Chrome browser extension that is mainly focused on Salesforce admin/dev productivity. You can get it and include more information from this site.

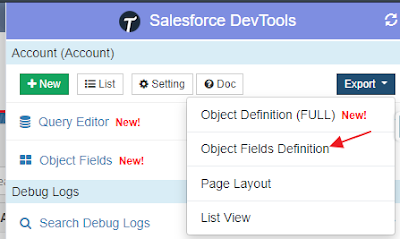
From the Salesforce DevTools panel, select the object >> Export >> Object Fields Definition 


You will get an Excel file with the following columns:
  • Field Label
  • API Name
  • Data Type
  • Length
  • Field Type, this is standard or custom field information
  • Required
  • Picklist Values
  • Formula
  • Extend ID
  • Help Text
Note Same as the previous method, the Excel file result will be based on field (and object for lookup field) visibility by the report running user.


So, which methods work best for you? I would say it depends on what you want to achieve, do you need extra information to retrieve, can you install an app into the org., can you switch back to Classic, how complex is the org., do you have visibility to all fields, etc.


Page-level ad